


Pioneer’s rekordbox is the almighty music management software that is beloved and used by many professional DJs. Best of all, the basic edition is free to use. If you are not yet familiar with it, know it is a must-have. It will make your life a lot easier when you understand how to organize your music in rekordbox properly.
In fact, the software enables you to get as meticulous with your management as you like. There is a little learning curve to get into the flow of learning how to organize music in rekordbox properly, but fear not.
We are here to guide you on how to cover the basics, such as importing, tagging, and smartly organizing your collection.
Managing your rekordbox music library efficiently is an excellent skill to cultivate as a DJ.
It will make preparing for performances, as well as sketching out mixing ideas far more straightforward than when you have tracks scattered on your hard drive. What music ordering process makes sense to you will ultimately depend on personal preference, but some rekordbox essentials will be of help to everyone regardless.
Staying on top of your music collection is an essential thing to master if you are serious about Djing, so it is a great idea to start with it sooner, rather than later. Let’s take a look at the tools that will help you to stay on top of your collection, however vast it may be.

Quick links:
- Importing Music
- Dynamic versus Static Analyzing
- Column Headers and View
- Tagging
- Color Coding
- Related Tracks Playlist
- Playlist Palette
- Intelligent Playlists
- Organizing Your Hard Drive
- Database Management and Backups
- Final Thoughts
Importing Music

Let’s start with the basics of organizing your music library in rekordbox. Importing music into rekordbox is fairly simple, but it is good to know your options.
There are a couple of different methods of how you can import your tracks
Firstly, you can go to File > Import, and then choose whether you want to perform the action on a single track, a folder, or a playlist.
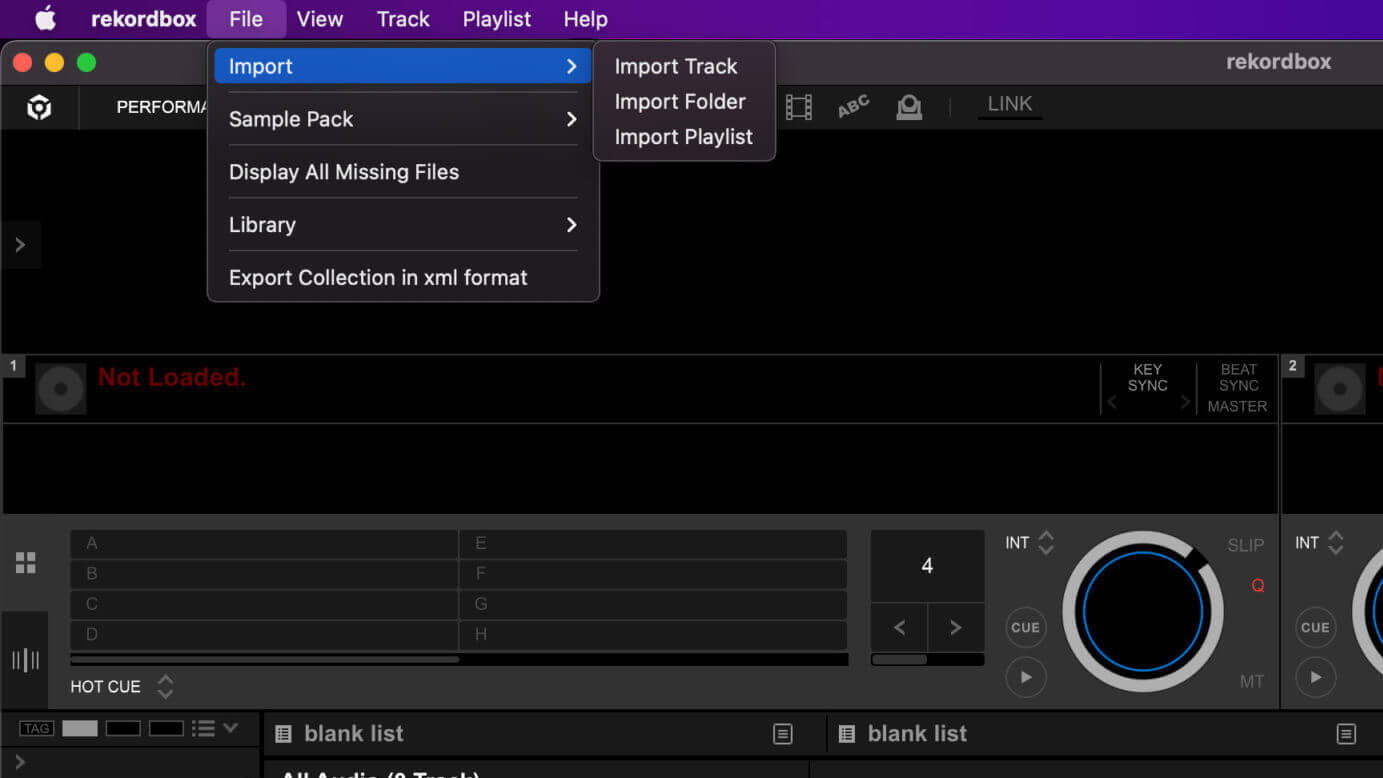
Alternatively, you can simply select the files in your finder/explorer window, and drag and drop them into the library window.
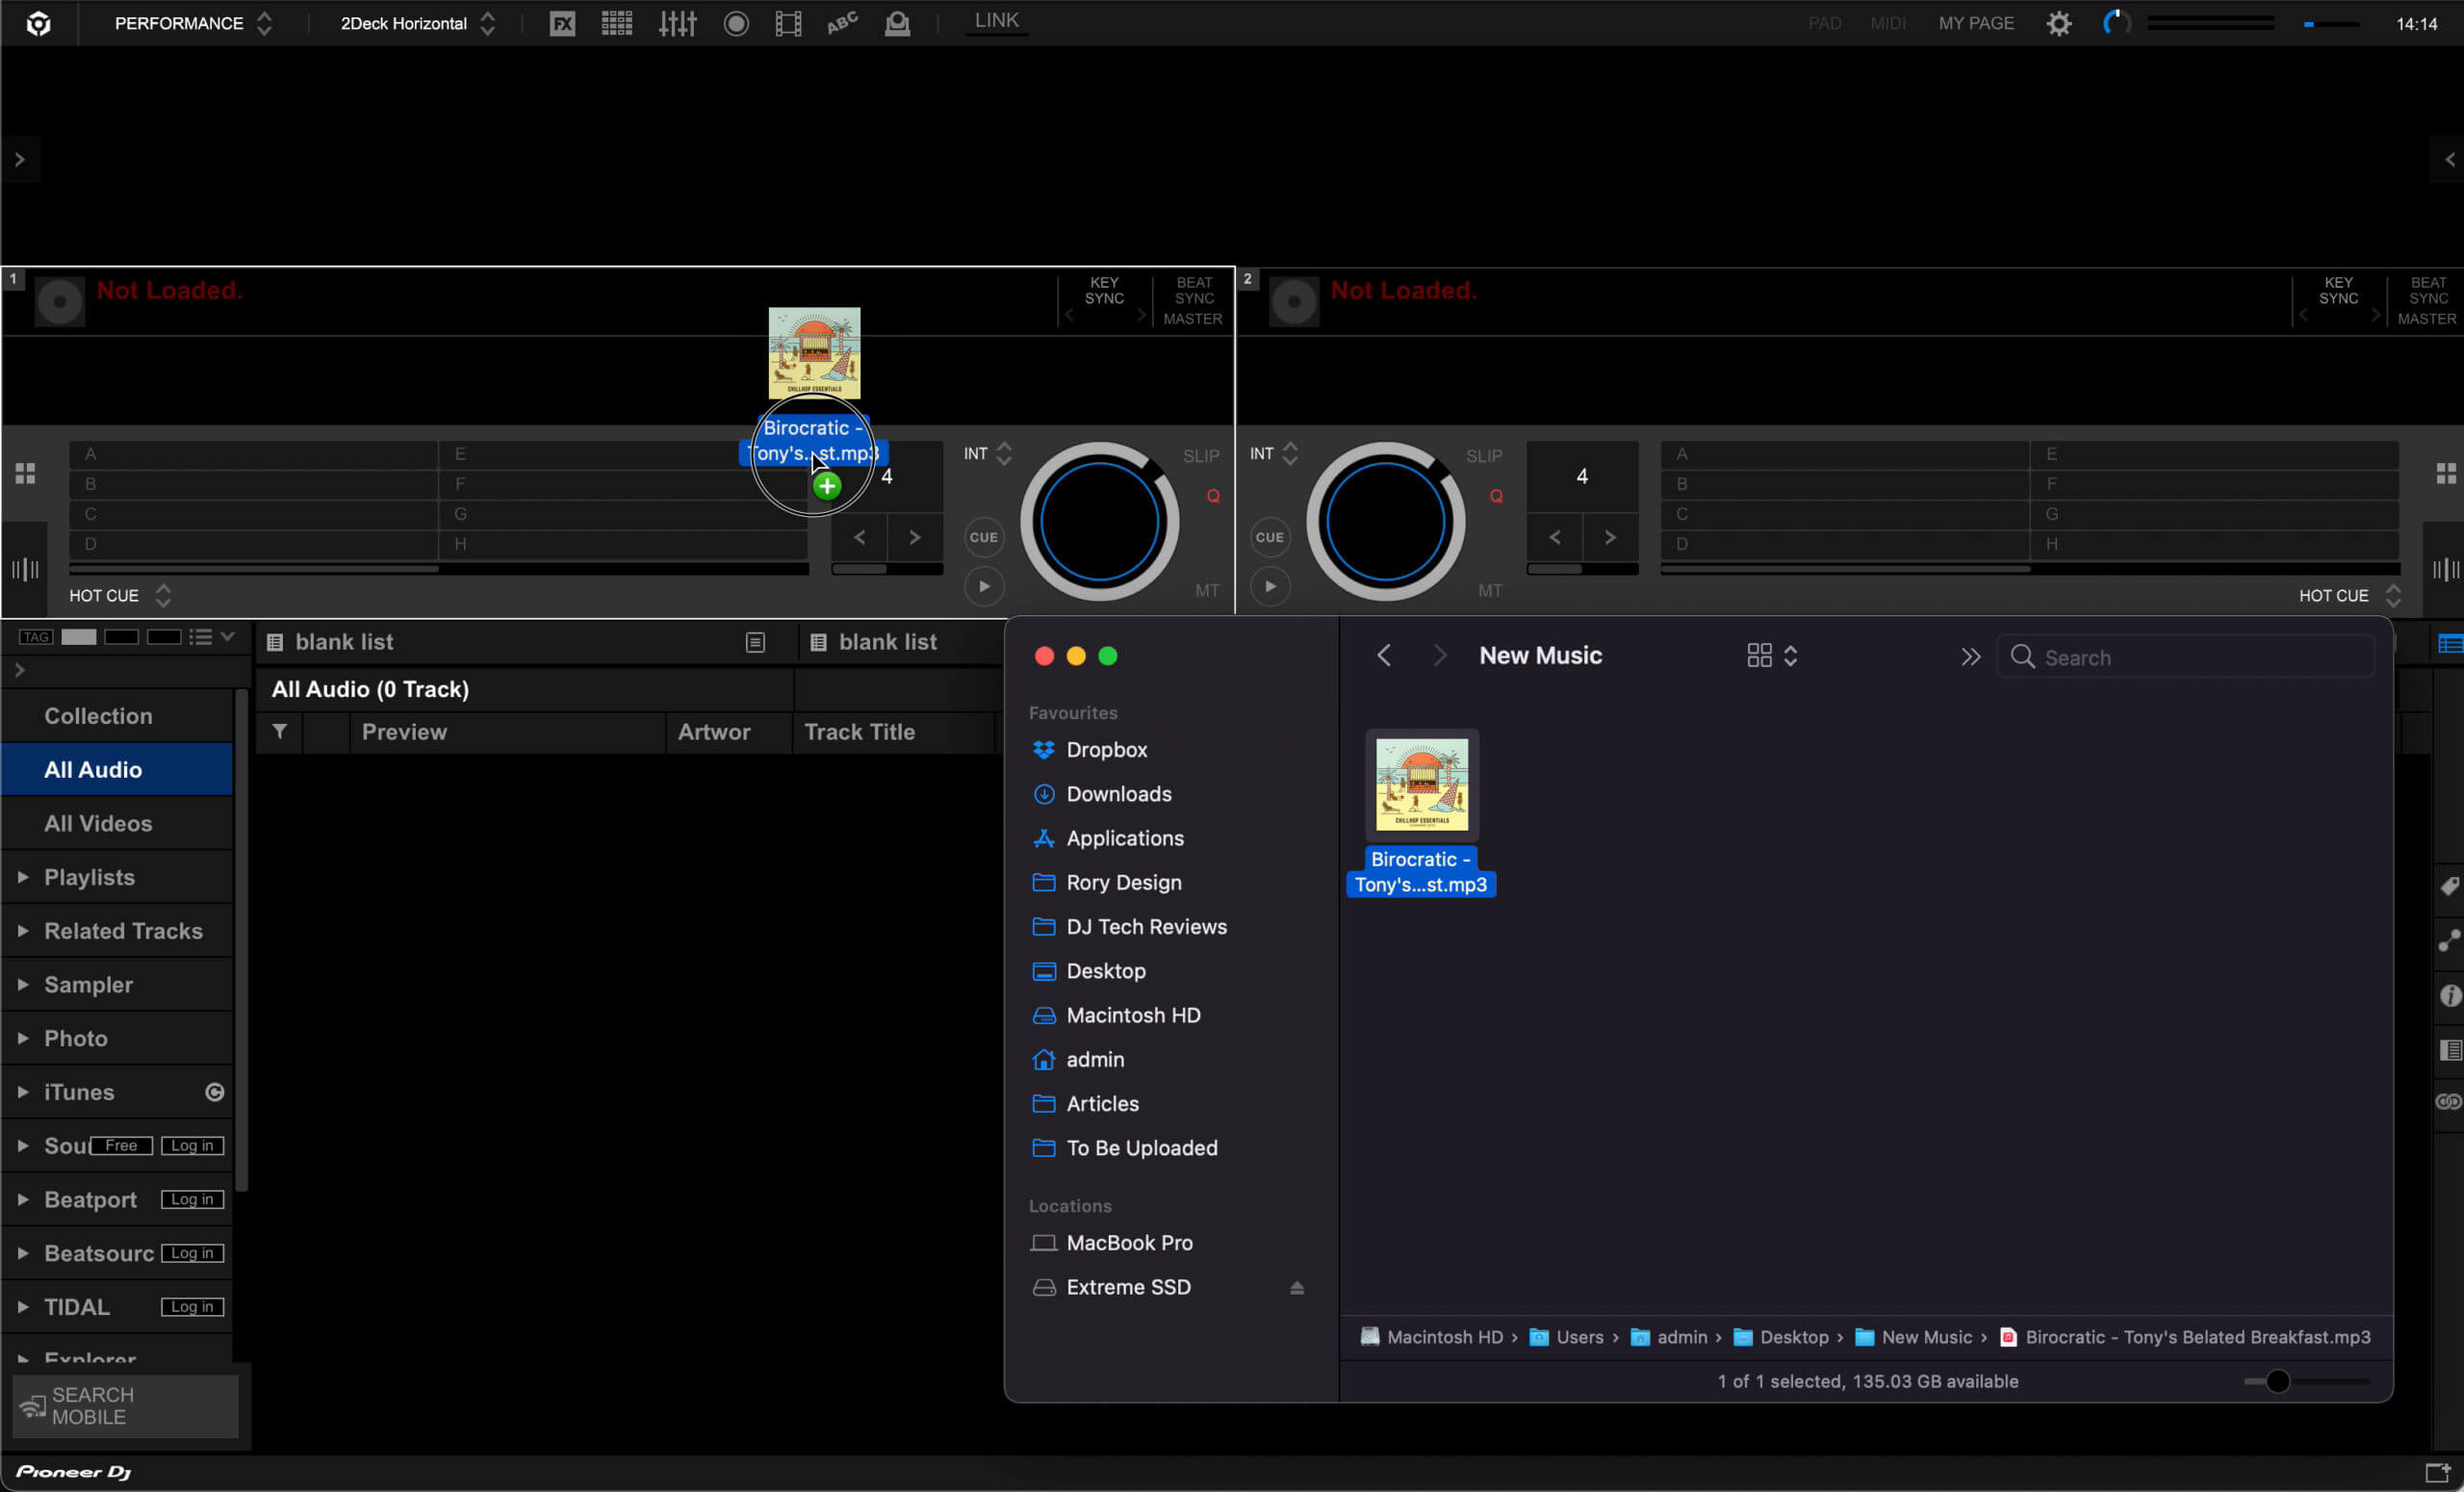
A neat tip is that you can take a whole folder of your music and drag it straight into the playlist section. That way rekordbox will automatically create a playlist for the songs in the folder you are importing. It saves you time and makes things convenient when dealing with a lot of tracks.
It’s a good habit to cultivate as playlists play a huge part in being able to navigate an extensive library efficiently.
Dynamic versus Static Analyzing
When importing any song into rekordbox, the software has to chew and digest it in order to prepare your music. It will organize your music in rekordbox so it can display accurate waveforms, the metadata, as well as create a functional beat grid.
The beat grid is important so that you can rely on rekordbox keeping things in time whenever you manipulate a track, and also to show you the precise BPM of a song.
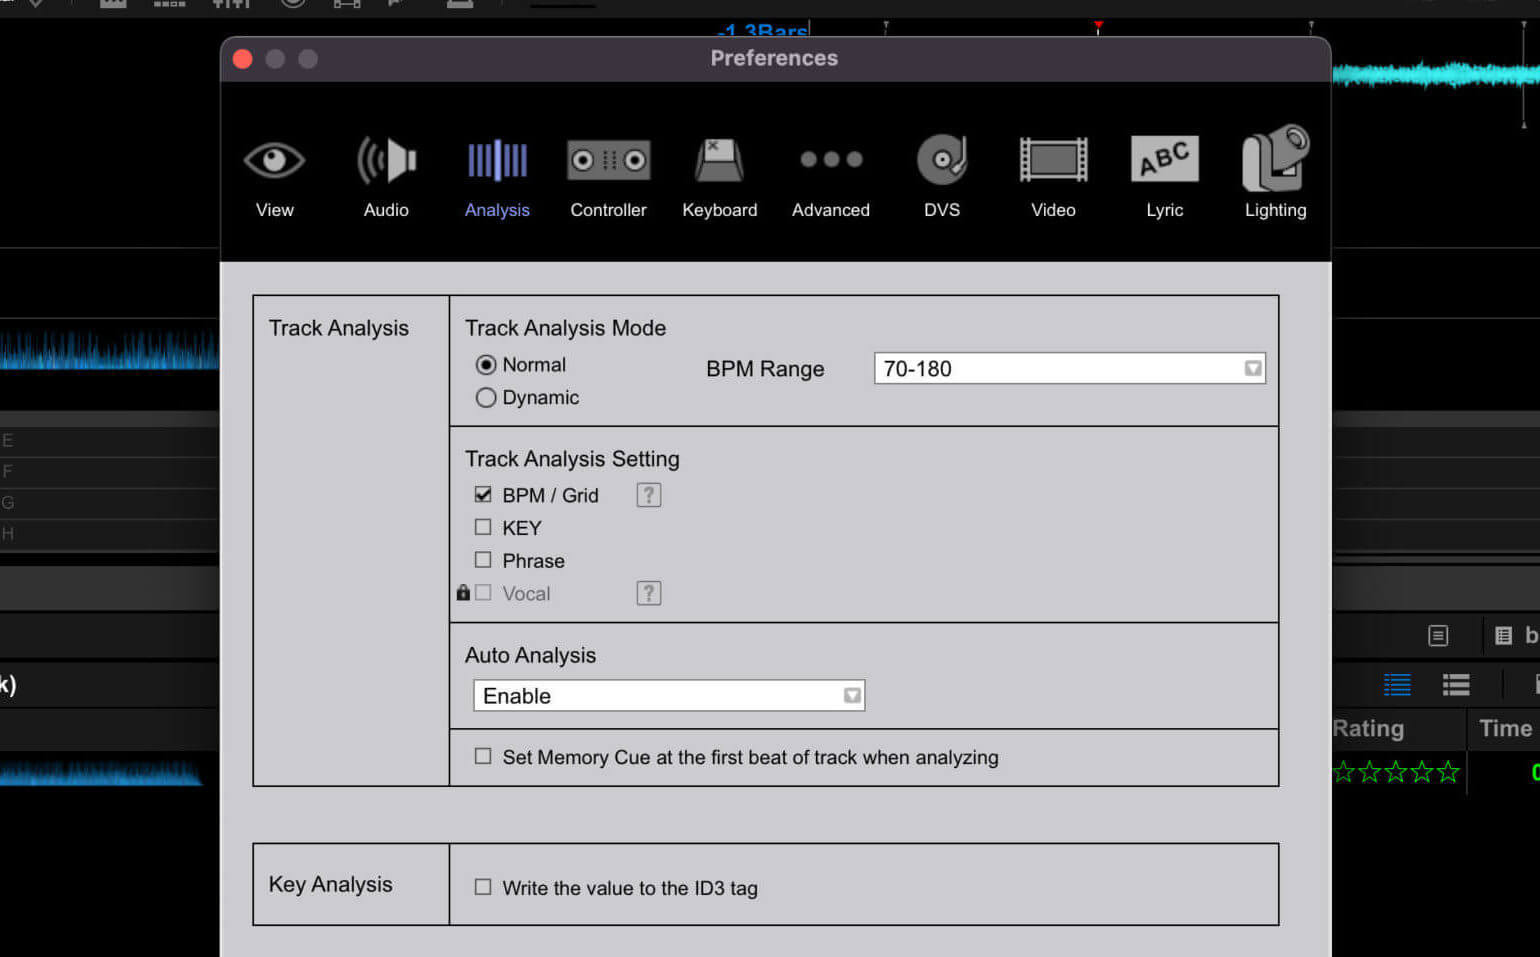
There are two ways rekordbox can analyze your tracks, in static mode and dynamic mode. By default, rekordbox will do it in static (normal) mode. This mode is meant for all tracks that have a steady BPM. However, if you deal with tracks that have varying tempos, often found in styles like jazz, rock, and indie, you will want to select the dynamic analyzing mode.
It ensures that rekordbox creates a micro beat grid that matches all the minute BPM variations. Things can get messy if you don’t, so this is an important step to remember when organizing music in rekordbox. To toggle between analyzing modes, go to Settings > Analysis Tab > Dynamic/Static.
This has to be remembered every time before you import a bunch of new files. If you want to analyze a single track in dynamic mode, click on the icon with three little bars in the player, then select Analyze in Dynamic Mode.
Column Headers and View
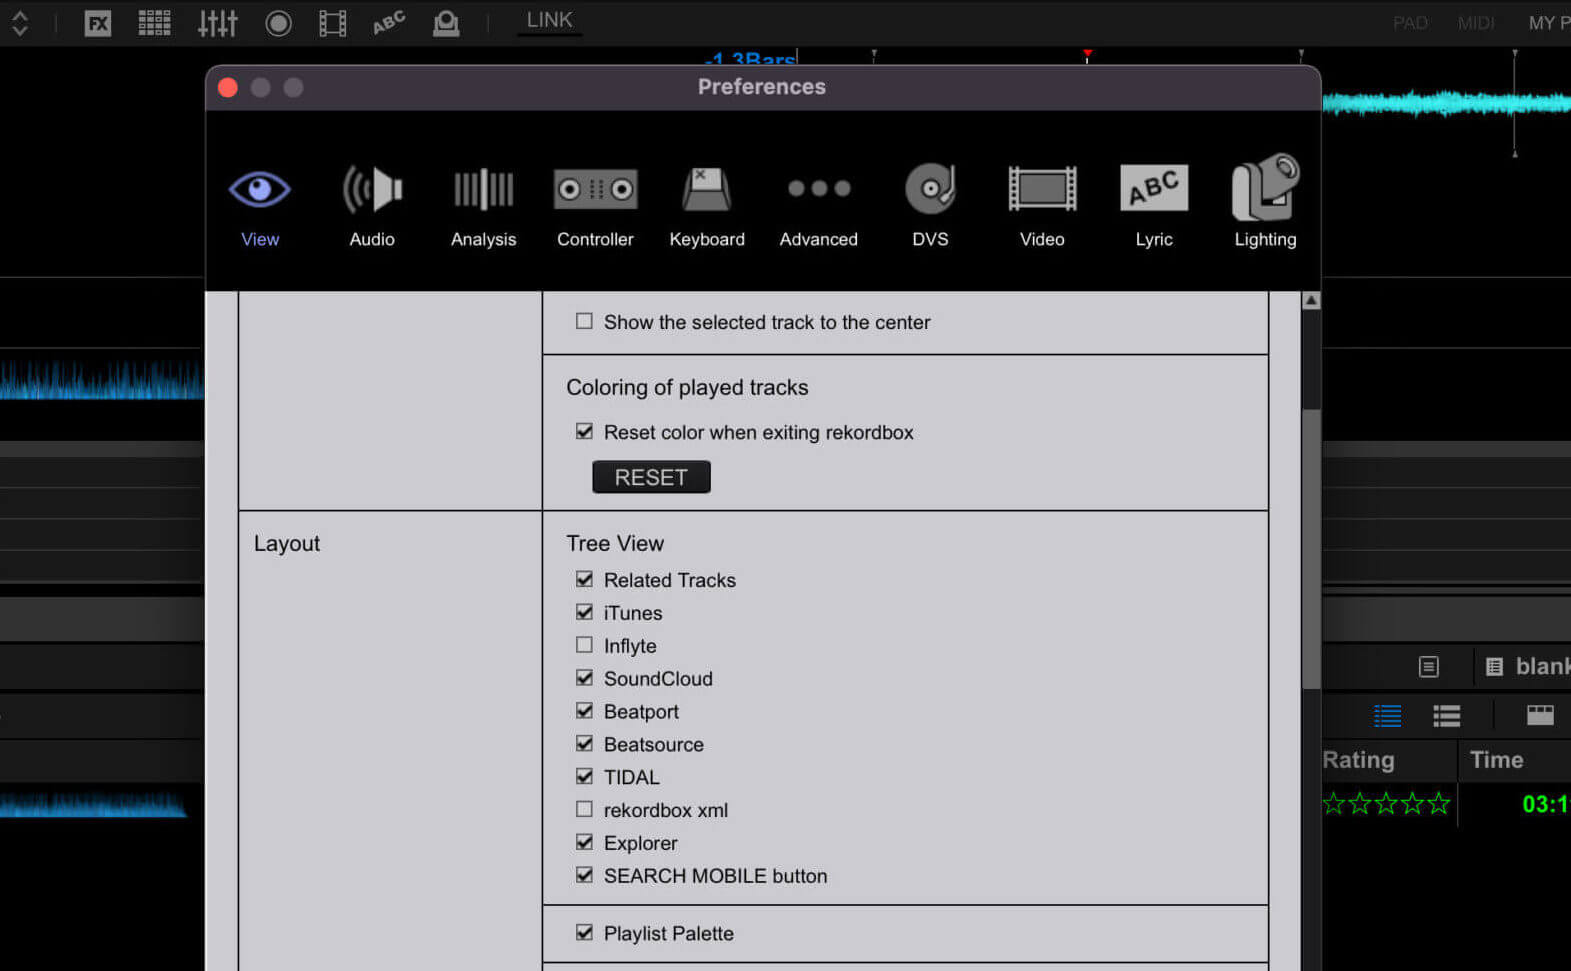
Pioneer’s rekordbox excels at giving DJs the ability to customize the way they organize music in rekordbox. The main view window is where a lot of the action takes place, and you can mend it to suit your specific needs. Various library modes can be found within the preferences.
By navigating to Preferences > View > Layout you will be able to switch to what you prefer by selecting what categories the software will show you in the tree view. You can also deselect the categories that you do not use to make your workspace cleaner.
The column headers can also be customized to what works best for you. You can do this by right-clicking on any column header. A drop-down menu will appear with the options available to you. Apart from choosing what categories will be displayed, you can also drag the columns around to change their order, as well as adjust their size.
Whenever you click on a particular column header, your library view will be organized by the specific attribute. Clicking twice will toggle between an ascending and descending order. A neat way to organize music in rekordbox.
Tagging
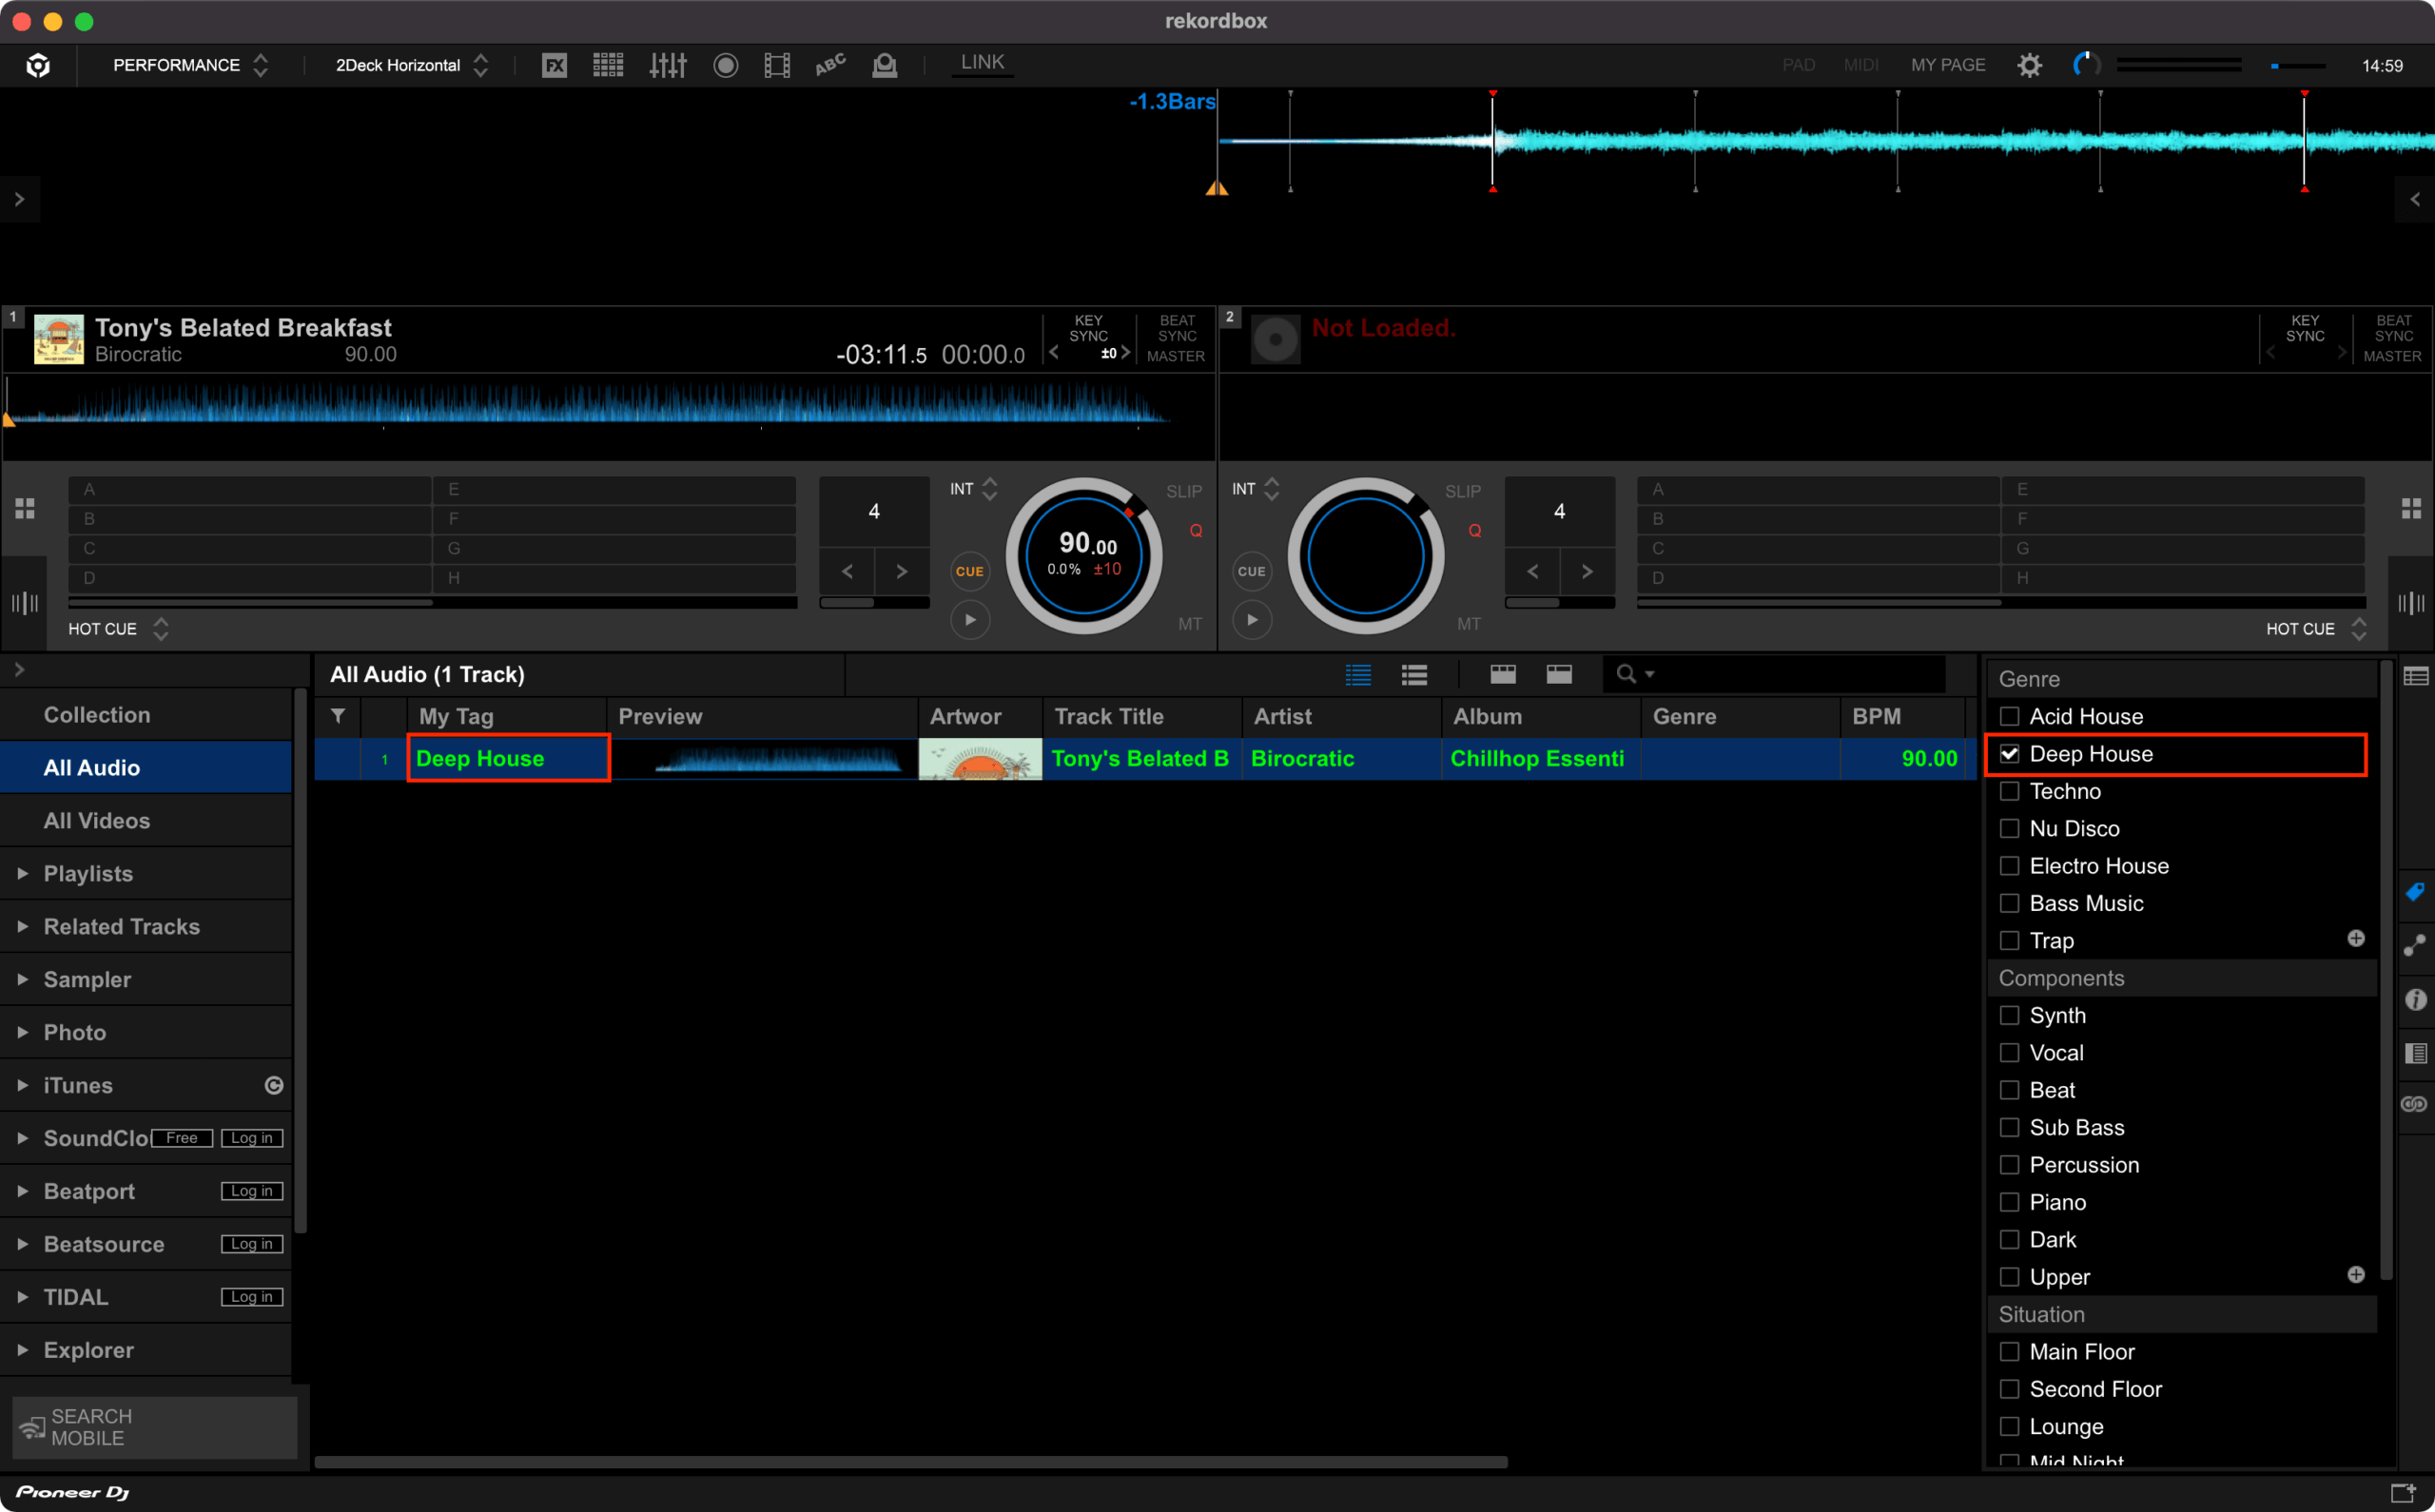
Tagging your tracks is a powerful way with which you can manage your music in rekordbox. Essentially, it provides additional, specified info on a given track, and you can choose what kind that is. Genres are good starting points for categorization, but they are pretty general.
Certain tracks seem to clump together by subtler threads we come to define by a personal understanding, and My Tags is perfect for that. A tag could be set according to the energy level of a track, its mood, atmosphere, instrumentation, whether it is an acapella, a sample, or something else that you find useful to go by.
You can locate the My Tag section on the right side of rekordbox, beside the library. It is the top icon of the four located on the side panel. You will find that the software has three groups set up by default. These are Genre, Components, and Situation.
The fourth is left blank for you to come up with. You can re-name the former three according to your needs, but there can not be more than four groups in total.
Below each group, you can get as creative as you want by adding sub-tagging options. To tag a song, select it while the tagging panel is open. Add checkmarks on each category you want the song to be tagged in.
After doing that you will be able to filter your library and locate batches of songs according to the selected tag. On the upper right corner of your library, you will find four small icons lined out horizontally.
When you hover above the one that is furthest on the right, the cursor will display a pop-up showing you it is the Show/Hide My Tag Filter. Once you open the panel, you will be able to find all of your tagged songs and filter them accordingly.
Color Coding
Color coding is another fantastic way to organize music in rekordbox and sort your tracks in a way that makes sense to you personally. It can be a strategic method to identify sub-groups in your library. A common way to use color-coding is for identifying similar moods or vibes of songs.
You could also use the codes to mark tracks that are dance-floor bangers or note tracks that didn’t sound as great on the dance floor as you imagined they would. If you see that a track does not work during a gig, then you can quickly mark it to remember to pluck it out of your collection.
Colour codes are especially great for quick sorting, say for songs in a playlist that you are considering for your next mixtape.
It works well as a dynamic labeling method because the coding is so quick to control. To color code tracks, make sure that you have the color column activated in your library.
How to color code tracks in Rekordbox
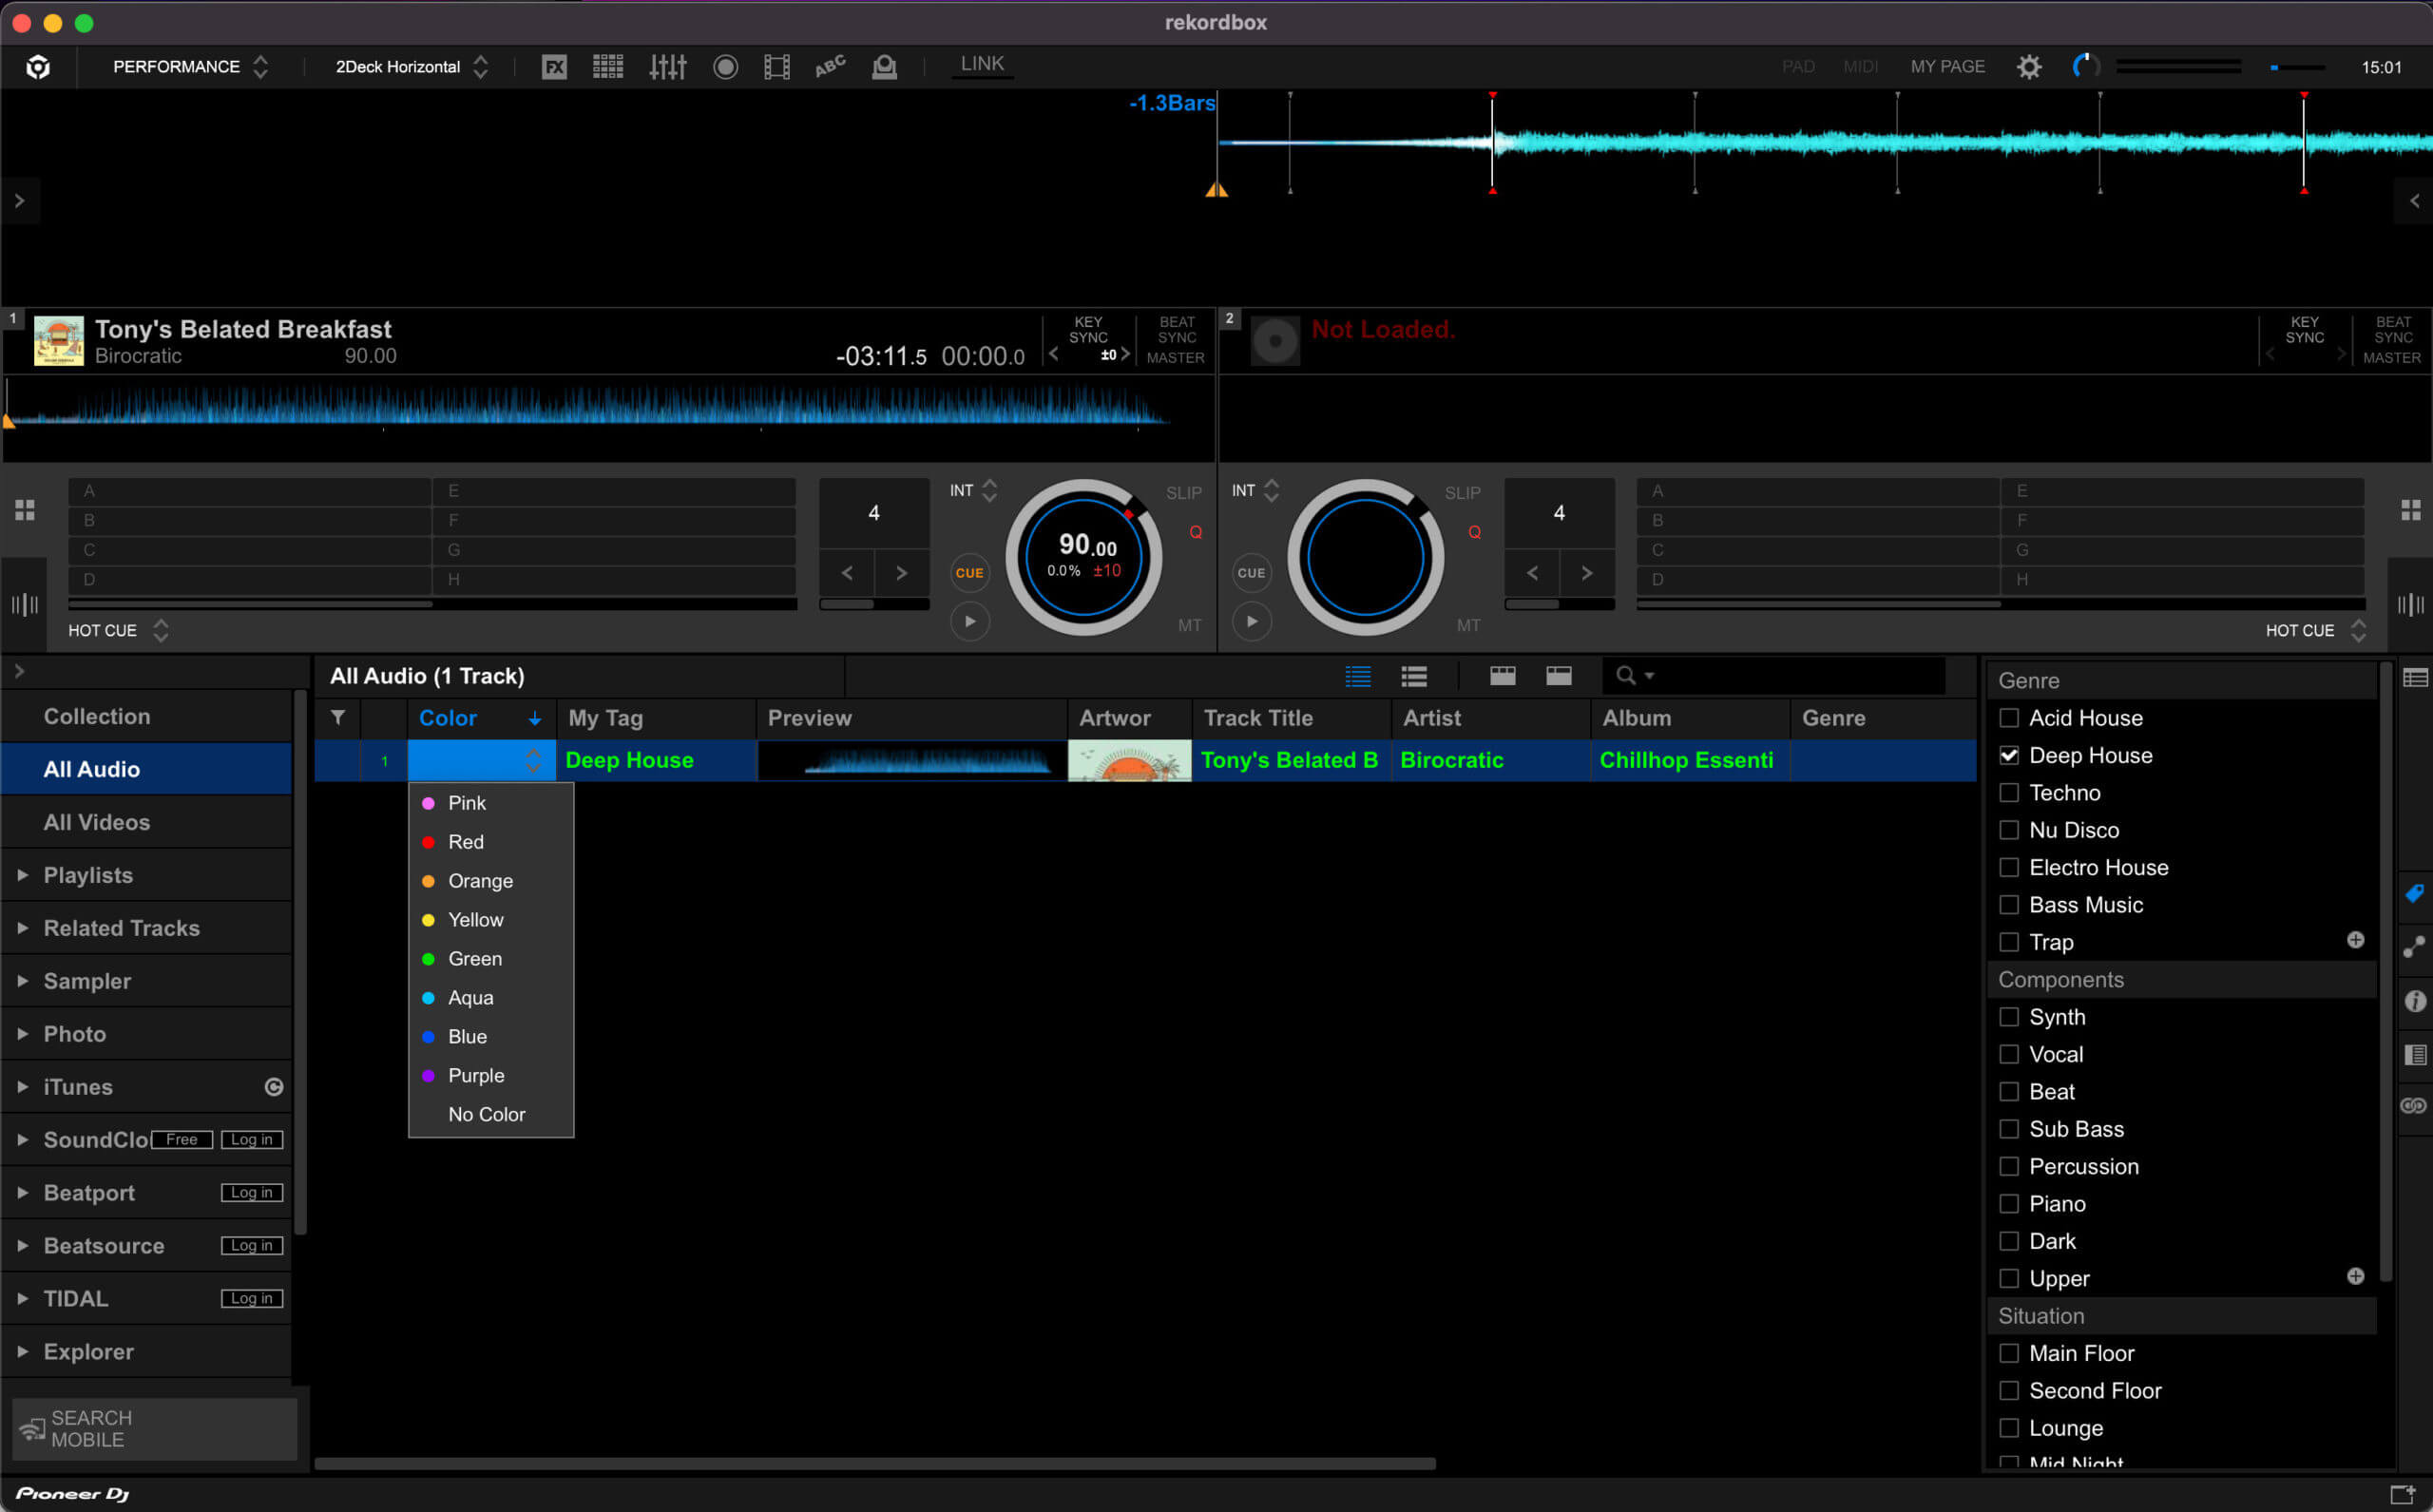
That is done by right-clicking on a column and selecting the option to be shown. Once you activate it, the color column will display all available colors you can use in your main library. By going to Preferences > Advanced > Browse, you will also be able to customize what each color stands for.
To color code multiple tracks, select your songs, open the info panel, then pick the color of choice.
Related Tracks Playlists
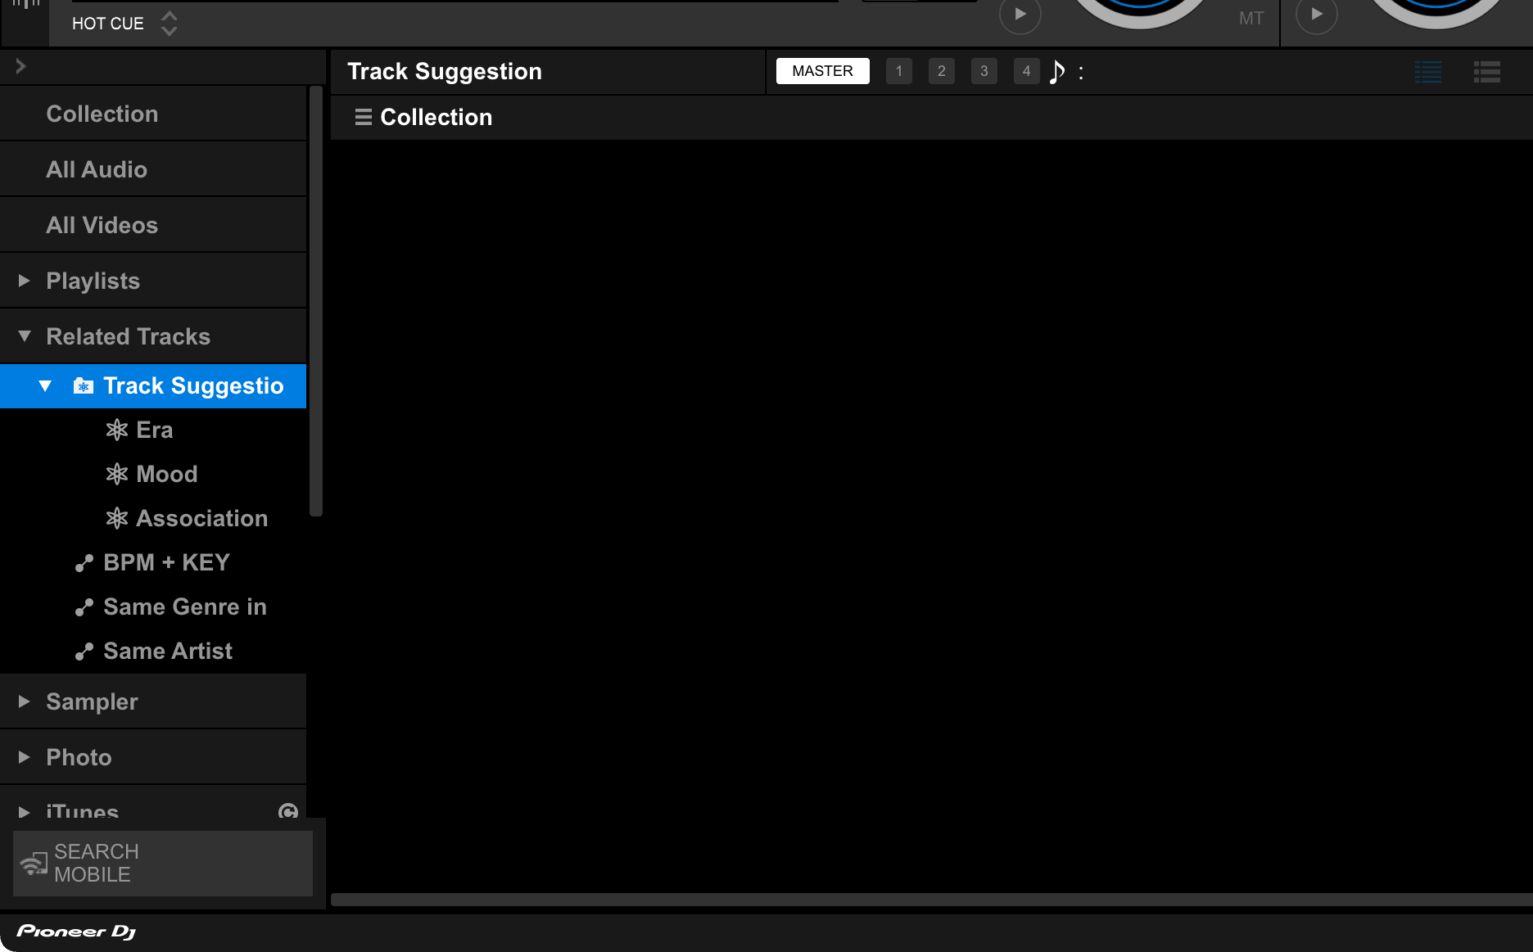
Pioneer’s rekordbox has a smart feature called Related Tracks. Essentially, it can help you to organize your rekordbox music by suggesting what tracks fit together according to their key, tempo, and other binding criteria.
This can be immensely useful while you are playing live, but it is also great for when you are crafting a playlist or grouping tracks for an upcoming set.
The menu for Related Tracks can be opened by pressing the box which is located under the My Tags icon. It is the second-highest amongst the four vertical icons found on the right panel. The Related Tracks feature will suggest songs based on the current one that is selected on your main deck.
You can specify how you would like rekordbox to suggest tracks by altering the criteria of the algorithm. This can be done by opening the advanced Related Tracks menu by pressing the little gear icon.
You will be able to make the algorithm filter songs by their BPM affinity to your main track, by key compatibility, label, and so on. By clicking on ‘collection’, you can also choose the places in which rekordbox should look for track suggestions.
All in all, the Related Tracks feature can come in handy for coming up with new mixing ideas, and for grouping together similar tracks.
Playlist Palette
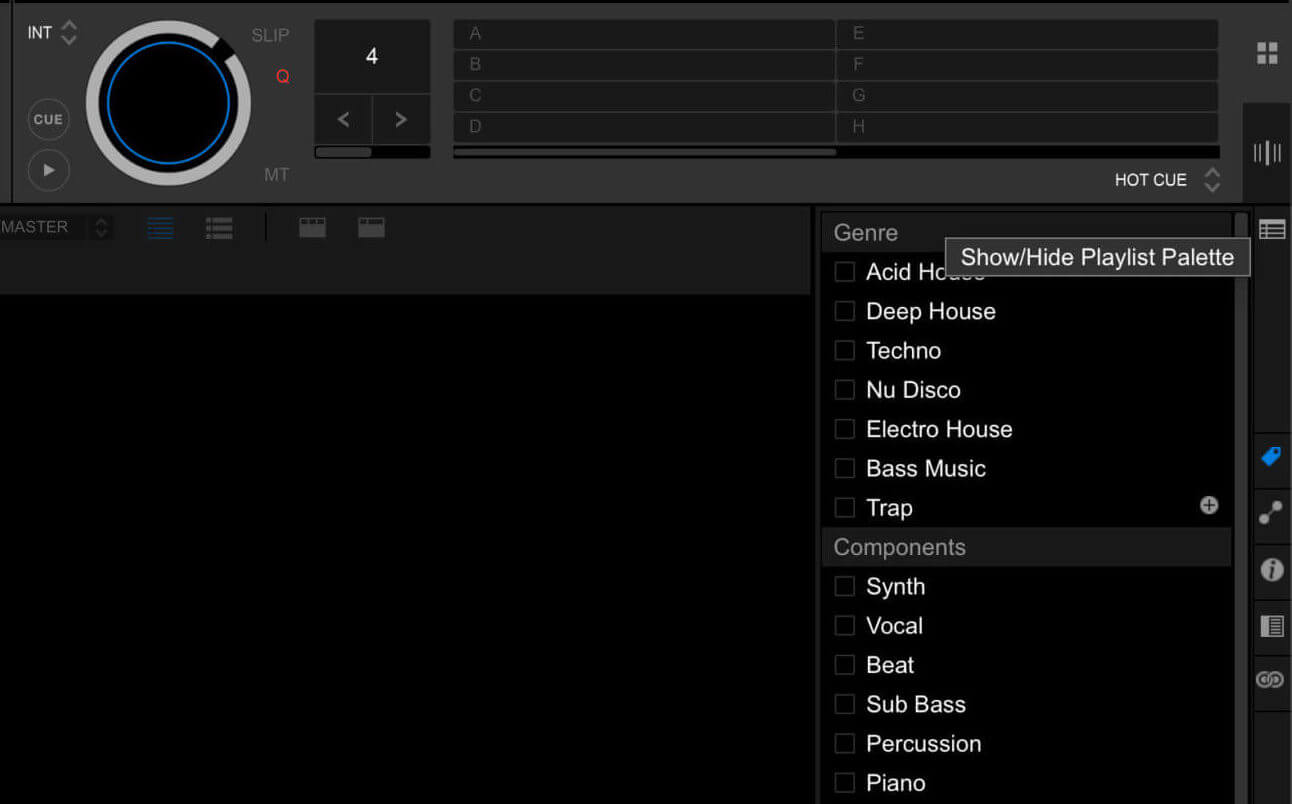
Playlists make up a huge part of organizing music inside rekordbox. Some people even use them as their main rekordbox organizational tool. After a while of using the software, they can stack up. It is not exactly practical to browse one playlist at a time.
Luckily rekordbox has a solution for that – the Playlist Palette. At the top right corner of rekordbox, right under the player, you will find the icon that opens it up. When you hover over it, the software will display the info pop-up, indicating the Show/Hide Playlist Palette function.
It allows you to browse four additional playlists, on top of your main one. The four small windows are for scrolling through your playlist tracks. To load a playlist into the palette, simply drag and drop it into one of the four windows.
This function gives you the freedom to navigate five playlists at the same time. The Playlist Palette also has three tabs that can be found on the upper left corner of rekordbox.
When the Playlist palette is open, the tab icons will appear above your Collection list. Each of the three tabs can contain four playlists at a time, giving you a swift reach of twelve interchangeable playlists.
These are well worth integrating into your workflow because the Playlist Palette is a very handy tool to maximize your efficiency when organizing your rekordbox music library, as well as when playing live.
Intelligent Playlists
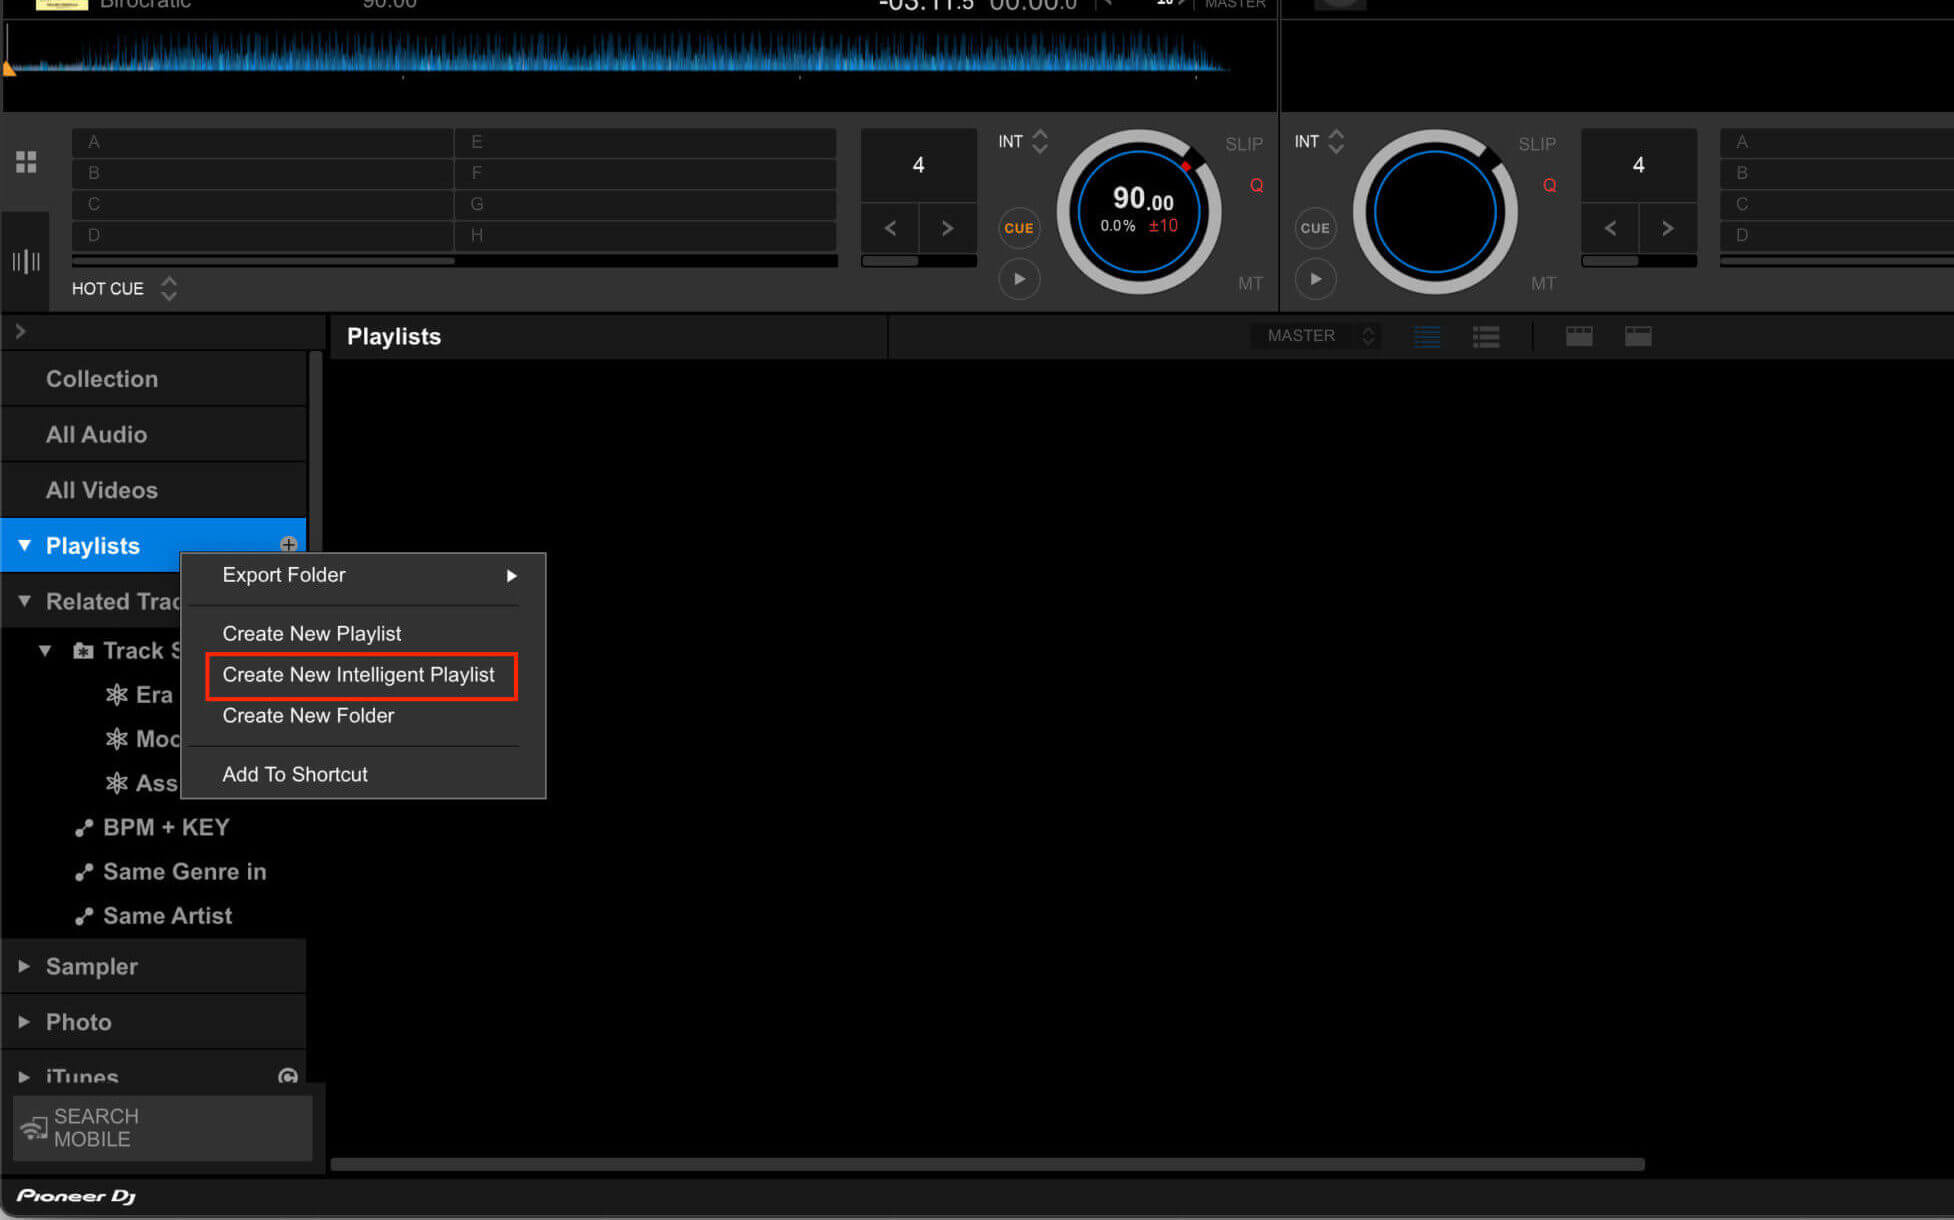
Ordering your rekordbox music collection doesn’t have to be a chore, especially when you can command rekordbox to do a lot of the thinking for you. The Intelligent Playlist feature employs the software to calculate your track data, and then organize your rekordbox music into playlists for you.
You can select all the criteria you want rekordbox to match when doing this, be it custom tags, style, import date, etc. To make an Intelligent Playlist, right-click on your playlist section and select ‘Create New Intelligent Playlist’. After choosing your criteria, the Intelligent Playlist will get populated by all the fitting tracks.
Whenever you import new music, and it fits into any given Intelligent Playlist, it will automatically be put in place by rekordbox. Essentially, you can automate the ordering of your music collection by setting up a bunch of smart playlists.
An example of this method in use could be creating smart playlists for every genre and BPM range, in increments of 10. After that, you could use color coding and tags to organize your rekordbox music library more intricately.
Bonus Tip: the five-star rating system beside each track can be used to indicate its energy level, rather than how much you like a track.
Chances are that you will like or love the tracks you add to your collection, leaving a 5-star system to be superfluous in many instances. However, there are no rules to this, so make it your own. Whatever works for you is the right way.
Organizing on Your Hard Drive
It is a good idea to keep all of your DJ music in one single folder on your hard drive. That way you can be sure it will be easy to move your whole collection in case you switch to a new machine.
Sorting through a hard drive of scattered songs can be arduous, and you will wish that you would have organised your music in rekordbox properly right from the beginning.
It is best to keep your collection tidy from the start so that everything is smooth sailing down the line. Don’t mistake the sorting of your tracks for having them in a neat collection on your hard drive.
The actual sorting process takes place in rekordbox and relates to database information. Before importing you want to make sure that your actual song files are well ordered.
Database Management and Backups

The ability to share a musical database between two or more computers is an important issue to address. It is relevant if you want to move your collection to another computer, synchronize a database between multiple computers, or when you simply want to have an external database just in case.
That is all possible. It should not be confused with backing up your library.
How to backup your music library in Rekordbox
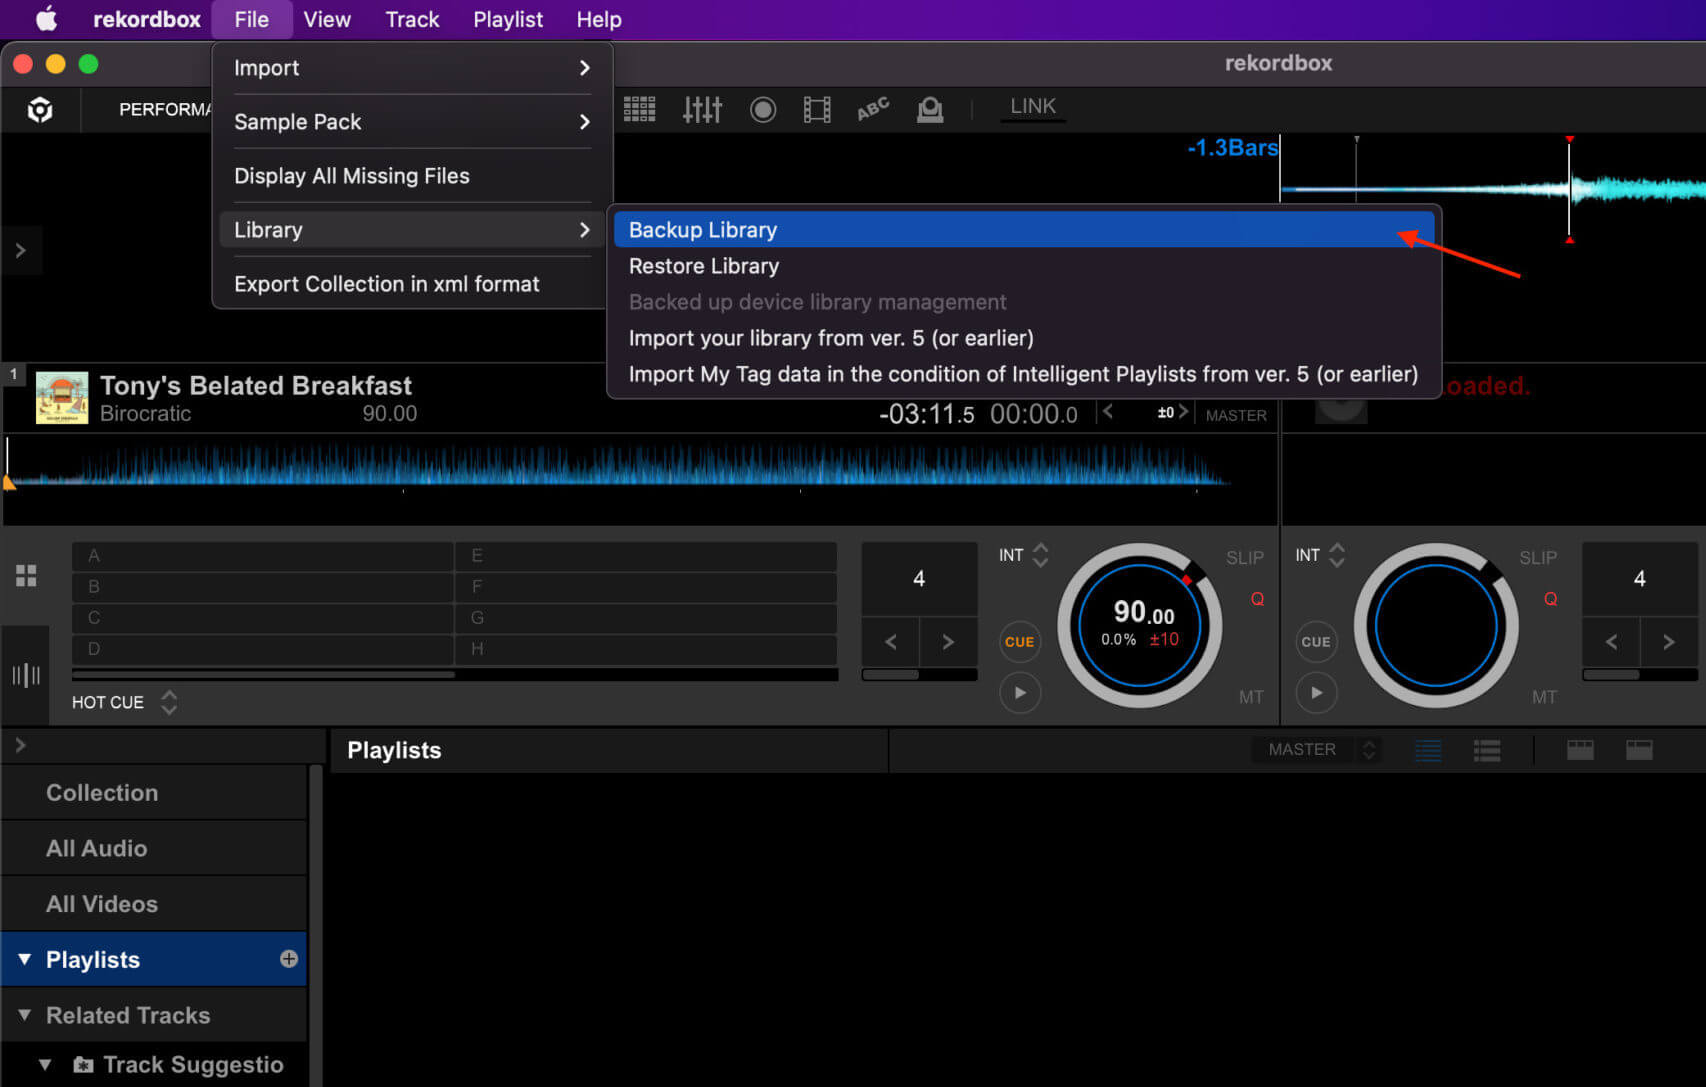
If you want to create a backup, that is done by going to File > Library > Backup Library, then selecting where you want the backup to be saved. Here we will tell you how to move your music, along with your database.
This will work if you are switching your database between systems with the same OS, as well as from MAC to PC, and vice-versa.
How To Move Database in Rekordbox
Firstly, connect your external hard drive. Open two windows, one where your music library is located, and one for the new place on your external hard drive. Copy your music folder to the new location on your external drive.
You can either leave the music folder in your original destination or delete it. If you want to leave it in place, it is recommended that you rename it, or the parent folder of the original location.
This will make things more convenient when switching from one database to another. Now when you open up rekordbox, you will see that there will be exclamation marks beside your tracks. This means that rekordbox can’t locate your files.
Select all your songs by pressing CMD + A/CTRL + A, right-click on any track, and select Relocate. Find the folder on your external hard drive where you placed your songs, select it, and confirm the relocation. That will take care of moving the music library.
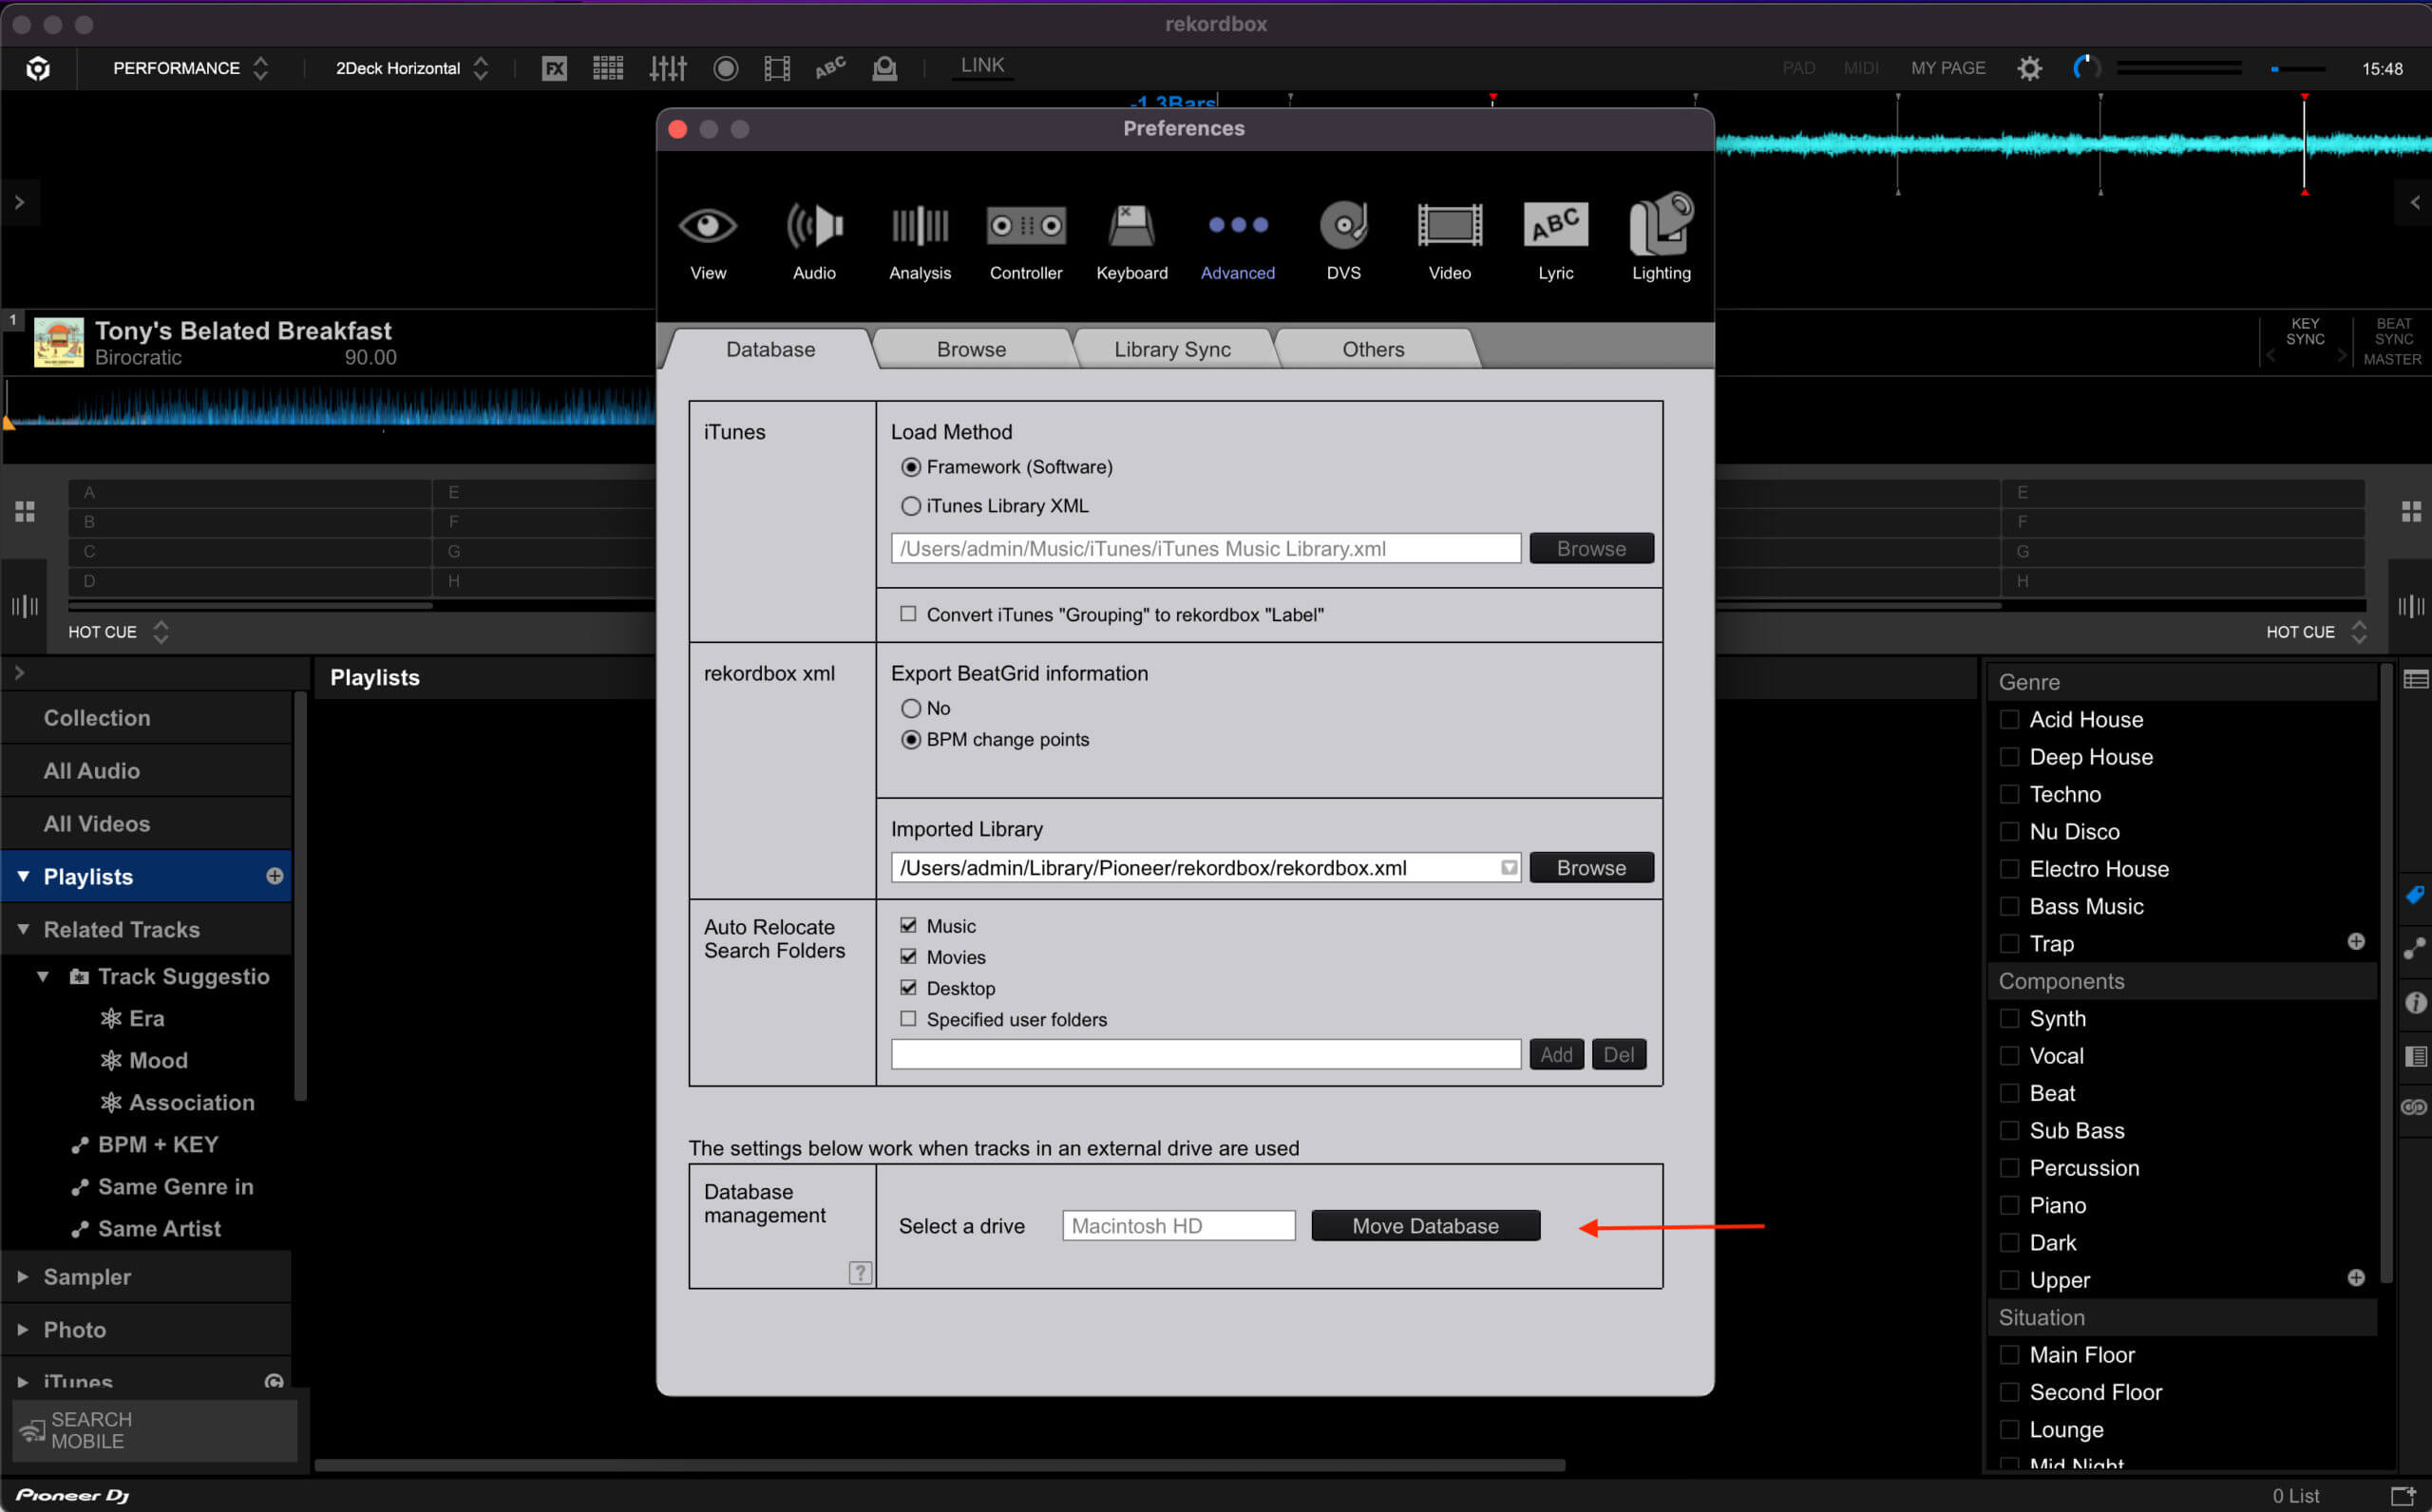
Now you will need to move your database, which contains all the internal rekordbox information, playlist info, and so on. To do this, go to Preferences > Advanced > Move Database. The software will ask you what drive you want to use. Select the appropriate one and confirm.
After you’ve moved your database onto your external hard drive, you will be able to create a new one if you wish. Whenever rekordbox does not detect the main database attached, it will prompt you to either find the location of a database or generate a new one. To switch between databases, go to Preferences > Advanced > Select a Drive.
Final Thoughts on How to Organize Your Music in rekordbox…properly!
We hope that you gained some insight on how to best organize your music in rekordbox cleverly.
There is no right or wrong way to go about your sorting process. The only important factor is whether you can make out what is what, and to be able to do so efficiently. The various functions, such as color codes, playlists, and tags are powerful tools to combine and make your own.
Get creative by establishing an organizing system of your choice and you will be on top of your library in no time. Remember to stay consistent and diligent when importing and tagging all of your new music.
Your future self will be grateful, and ultimately, you will be a better DJ for it.
