


Have you ever been DJing and two tracks have just worked so well together that you wished you could save your mix and play the two tracks as one? Or maybe during a day dream you somehow thought two tracks might just work really well together? Well we are here to show you how to make a mashup dream a reality.
You can make a mash up live on a DJ set up but we can also manipulate various audio files in a DAW and literally mash them together to make our own personal version for use in DJ sets.
This is what we will be doing today. We will be utilising the free version of Serato Studio for the initial sketch, then doing some final production and mastering in Ableton Live 10. We’re using Live 10 Suite, but Standard and Lite will also work fine for this purpose.
So let’s get stuck into how to make mashup songs!
How to Make a Mashup Step 1
Sketch Pad
Serato Studio is a great place to start learning how to make a mashup, not least because of the powerful key detection and transposing capabilities. If you’re not using Studio to get going, it’s very important to know the musical key of the source audio files you will be working with so that there is no clashing.
You can detect the key of a track using a tuner, spectrum analyser or searching sites like tunebat.com. If you have ever found yourself in that situation mentioned earlier about two tracks working really well together in the mix, it’s likely that these tracks were in key!
If you have used any sort of Mixed In Key (or Serato) products before you will probably be familiar with the camelot harmonic mixing wheel. You don’t need to know music theory to use this but it is very helpful when learning how to make a mashup to know that every Major Key has a relative Minor Key and visa-versa, which will always sound good together.
Furthermore, each major/minor will have it’s ‘opposite’ major/minor, which will also sound musically pleasing when mixed together.

Once you have decided on the tracks you want to mash up, you might want to consider using an acapella (i.e vocals only) of one track and the instrumental (i.e no vocal) of another. There’s many ways to get your hands on different versions of tracks if you want to take this approach.
How to Make a Mash Up Step 2
The Right Stuff
There are sites like acapellas4u.co.uk where you can get your hands on plenty of free acapellas, and bpmsupreme.com/ which is a paid service, but you can get access to tons of high quality instrumentals as well as acapellas. There are also sites like phonicmind.com that use AI to extract vocals from your source track. The results are not always perfect but this could be a good option if you can’t find what you need elsewhere. And… there’s always YouTube.
For this particular project, we are actually going to use two full tracks, partly to demonstrate that it is not essential when making a mashup that you have an acapella and an instrumental, however when taking this approach we need to choose our source tracks carefully. We need space in our ‘main’ track where there are no vocals so we can fit in the vocals and melodies (etc.) of the ‘secondary’ track without it getting too busy.
The ‘main’ track we have gone with is “Seventies” by Re-Tide ft. Elizabeth, which itself contains a sampled bass line from a disco track from 1980 called “Far Beyond”, which you might also recognise from Basement Jaxx’s classic hit ‘Red Alert’.
This track has plenty of instrumental sections and not too much in the way of melody so we can add in parts from our ‘secondary’ track – “Oh La La” by The Wiseguys with relative ease. Whatever you decide on regarding the source tracks, be sure to obtain the highest quality audio file possible so that the production sounds clean, crisp and professional. That’s a really key tip when starting to learn how to make a Mashup!
How to Make a Mash Up Step 3
Mashing It Up
To start the process we will drag our ‘main’ track (“Seventies”) onto an audio channel in Serato Studio’s arrangement view, and then drop the ‘secondary’ track (“Oh La La”) onto a ‘sample deck’. “Seventies” will provide most of the drums, bass and structure for our production, and ‘Oh La La” will occupy the mids and highs.
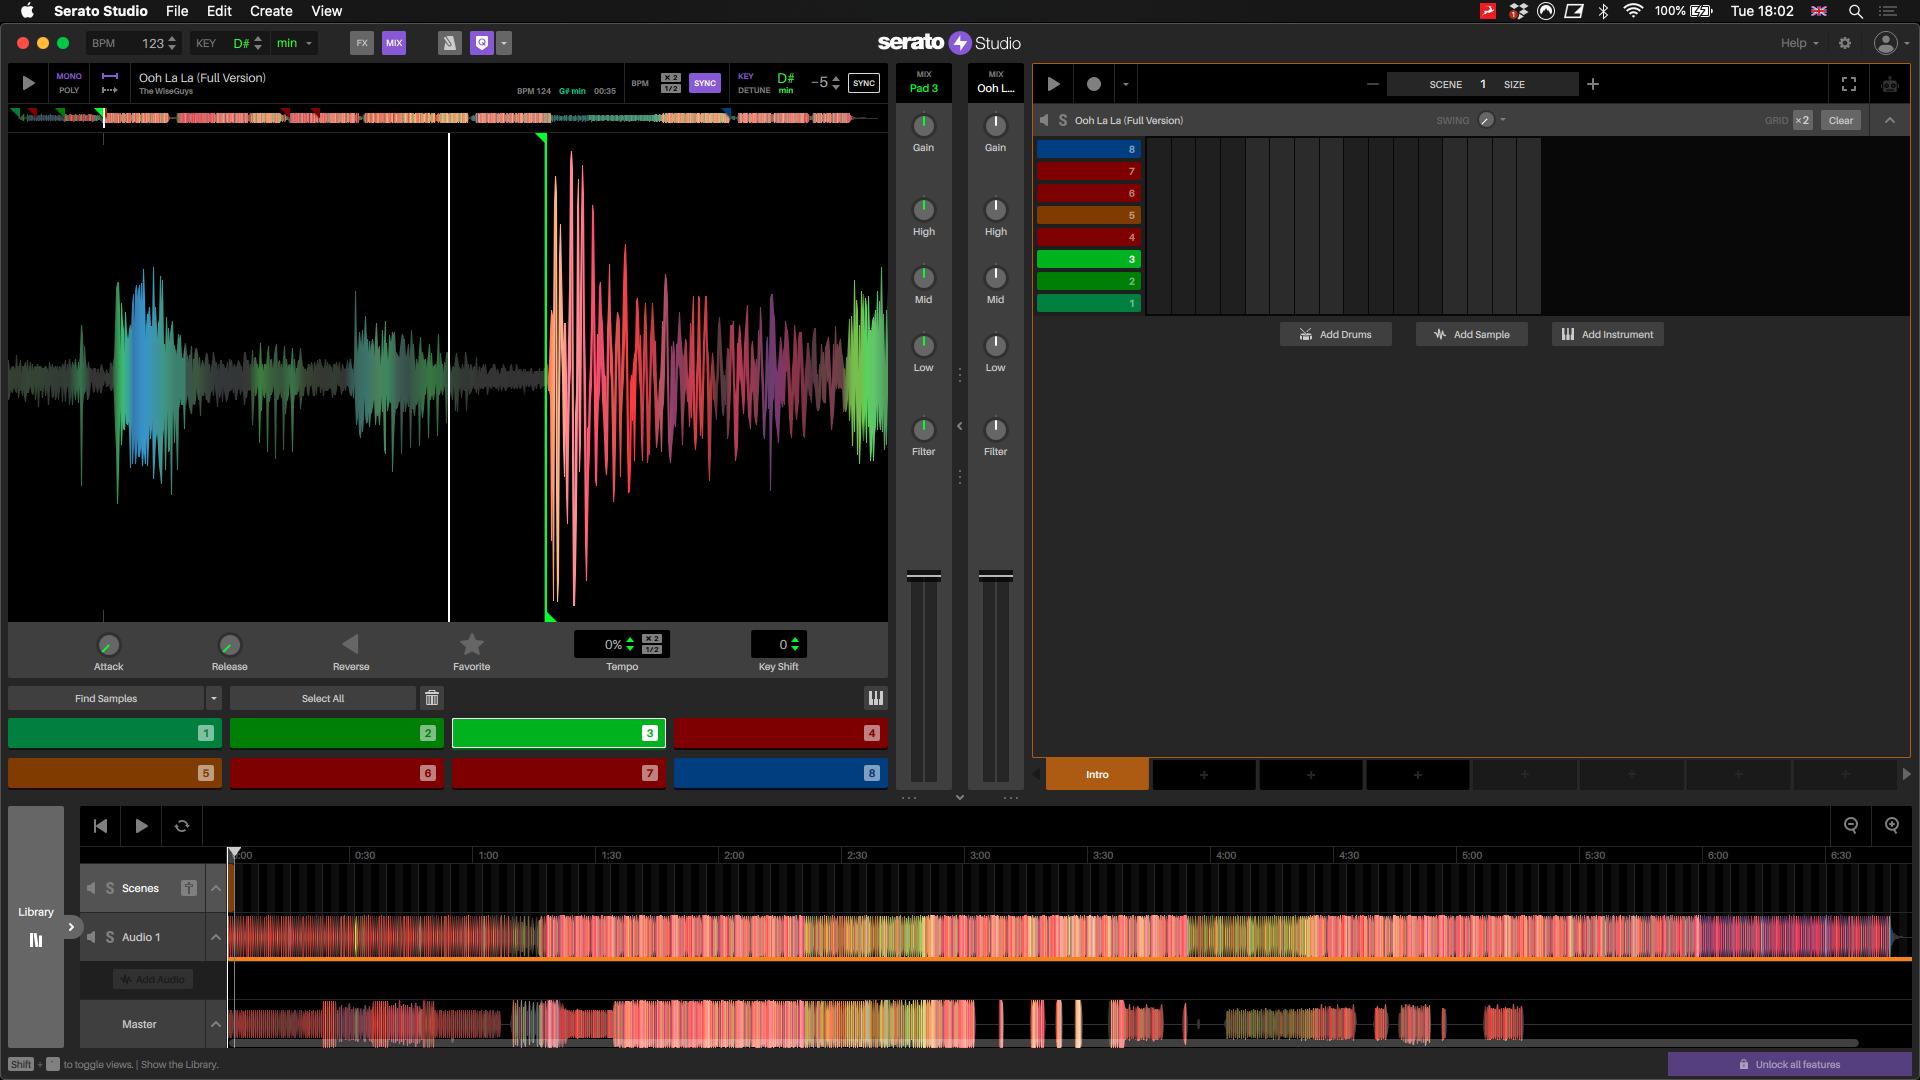
Just like magic, the tempo and key of the session is set to that of “Seventies” and then the tempo and key of “Oh La La” is automatically synced, saving lots of valuable production and head scratching time. Trying to work this out ourselves, then pitching and warping the audio manually would be time consuming and laborious.
As we are using two fully mastered (i.e. loud) audio files, it is wise to bring down the volume fader for “Seventies” by at least 4db and cut the lows out of “Oh La La”, and also knock down the volume a touch.
Now, we will use the cue points from the sample deck to start incorporating different parts of the ‘secondary track’ into the ‘main track’. If you are not sure where to set your cue points you can use the ‘Find Samples’ option to generate some initial ideas.
It’s important to note when you make a mashup that cue points need to be set bang on the initial transient so that the sample stays in time with the main track. Next, we will set some cue points at logical positions. Using the computer keyboard (or MIDI controller) we can tap out some ideas whilst playing the ‘main’ track.
Once we have found some good cue points we can look at making a new structure for ‘Oh La La’ using the ‘Scenes’. Here, you can have fun and experiment with different cue points hitting at different times as well as adding some effects processing such as reverb and delay on the individual cue points.
Once we are happy we can draw in (or record) the cue points into scenes. In this production we will utilise the fact that the key of each cue point can be transposed irrespective of the session or main sample key.
After some checking, the ‘breakdown’ scene sounds good at the original key so we will notch it up by five semitones. This will make the overall production feel a bit more familiar to the original of “Oh La La”.
With the free version of Serato Studio we are limited to four scenes which is a bit of a curse, but also a blessing in disguise – it would be very easy to get carried away creating intricate chopped up patterns at this point but the enforced limitation means we can keep focussed on the core structure of the track.
With the four scenes we can make (for example) an ‘Intro’, a ‘verse’, a ‘breakdown’ and a ‘main’ section. There is a glaring omission of a ‘chorus’ and ‘drop’ here so at this point we could definitely do with a few more options so we are going to perform a quick ‘hack’.
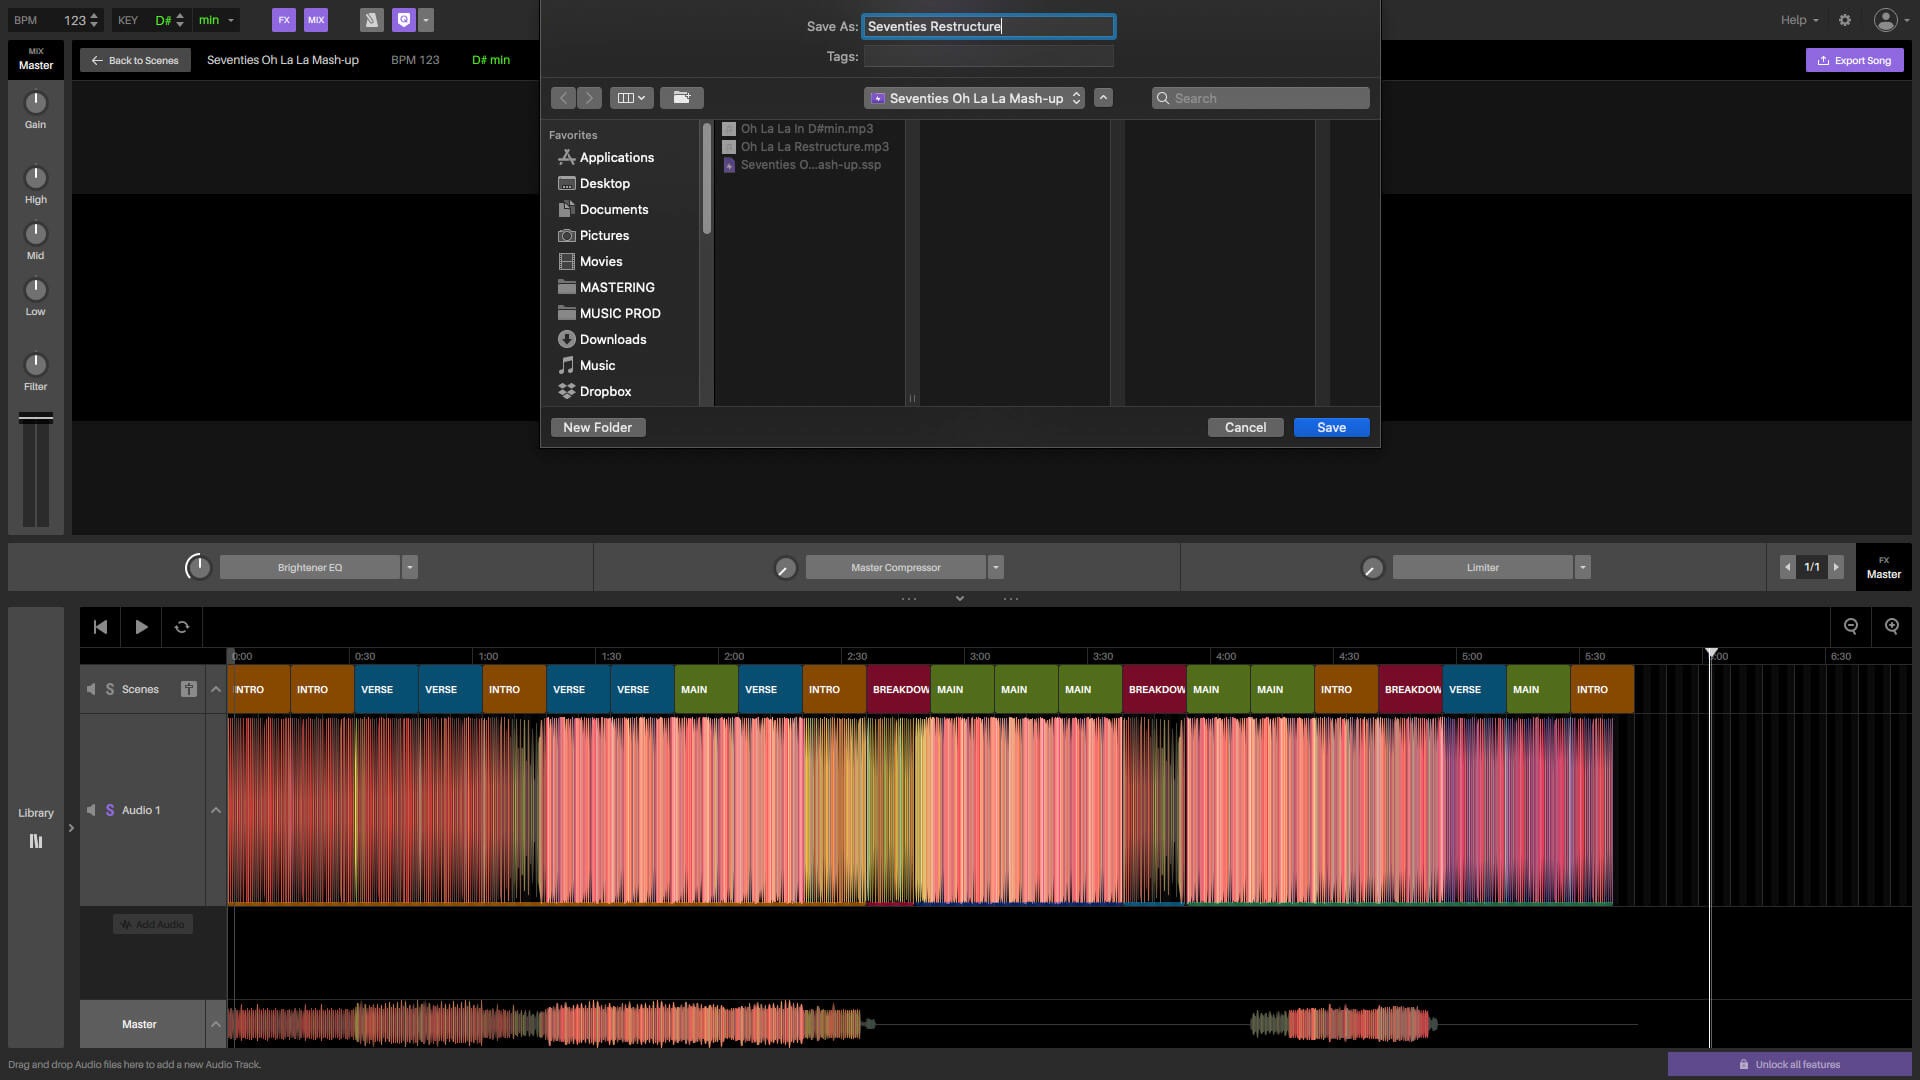
If we take note of the synced key and tempo properties on ‘Oh La La’ (i.e 5 semitones down, and 123bpm), we can quickly start a new session (remember to save first!). Then import “Oh La La’ set the key to D#m, and the temp to 123bpm and bounce it out for use in Ableton Live later.
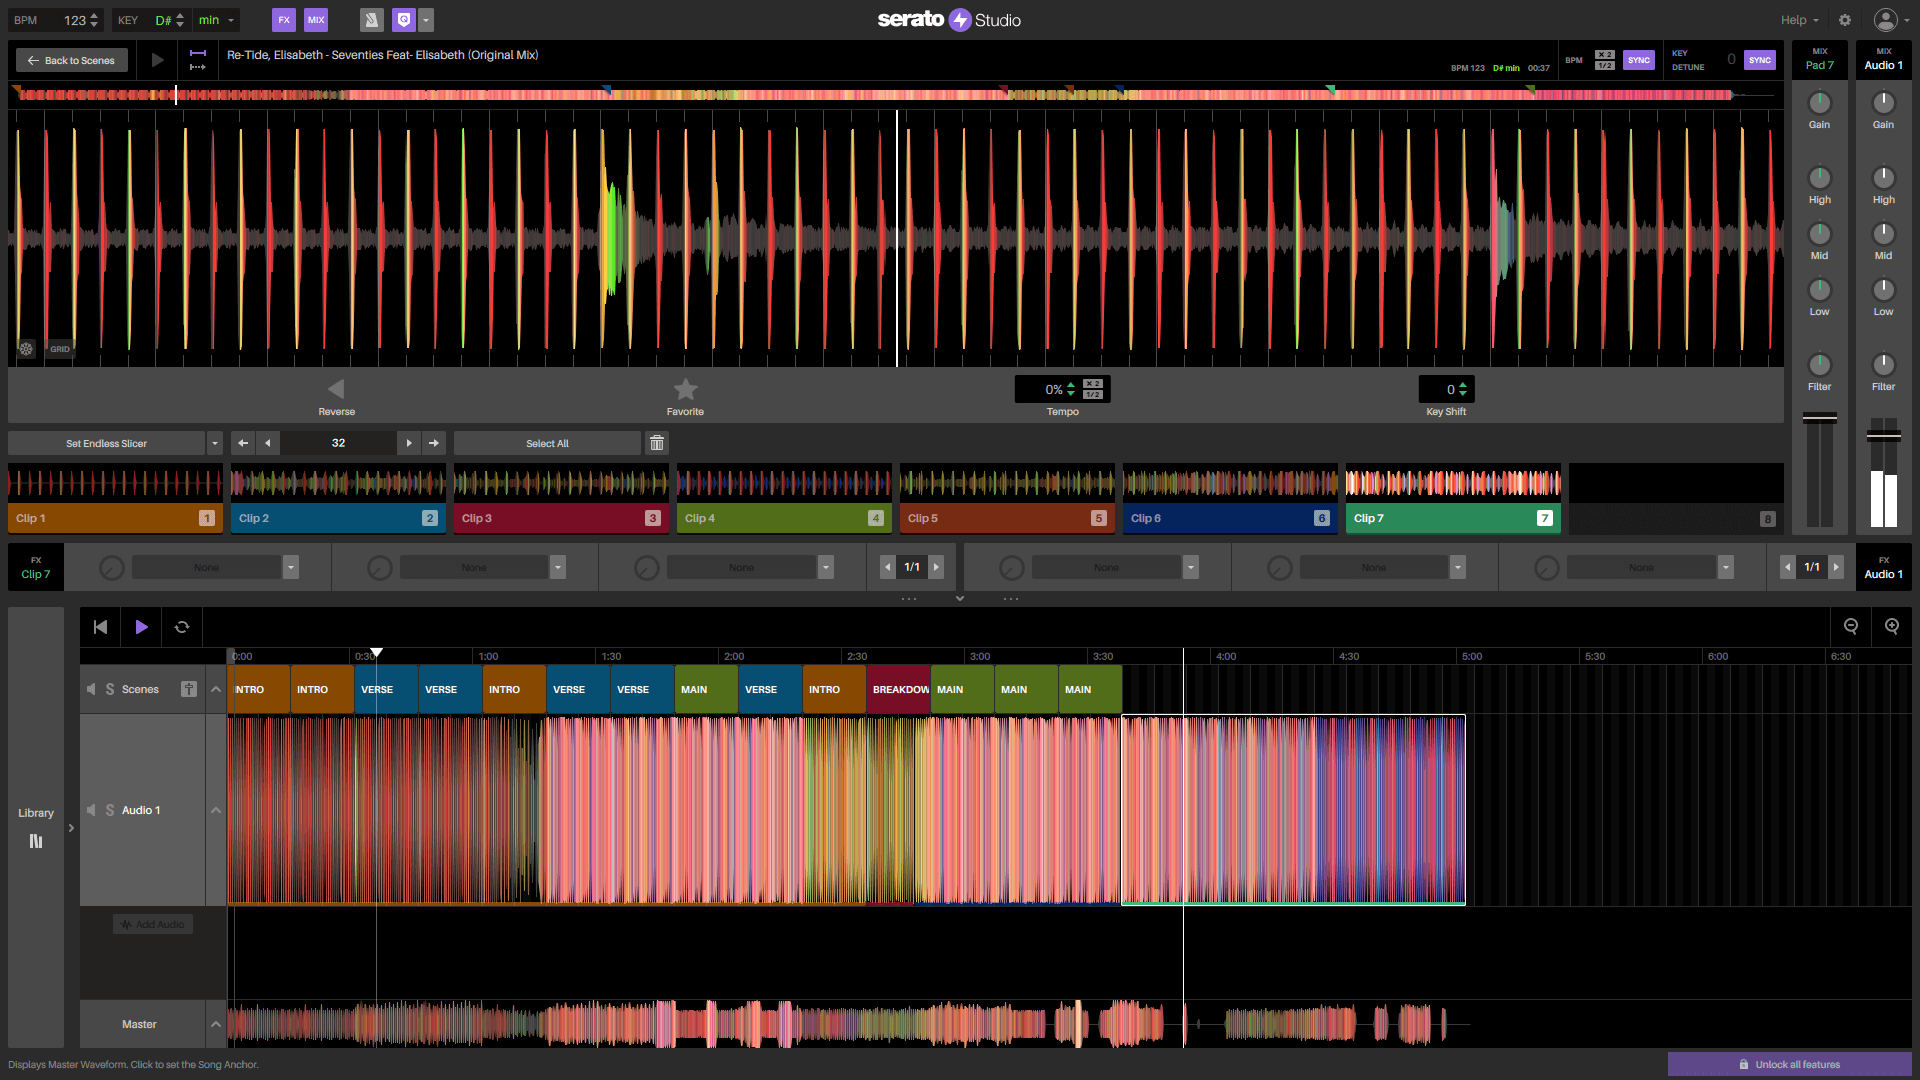
Before that though, we can have some fun restructuring the main track using the 8 available cue points and fit our secondary track in however we see fit;

How to Make a Mash Up Step 4
Taking It To The Next Level
We are most definitely in full-on how to make a mashup territory now, and it’s sounding good, but it is at this point that the limitations of the free version of Studio are just a little too hindering to get the track sounding complete.
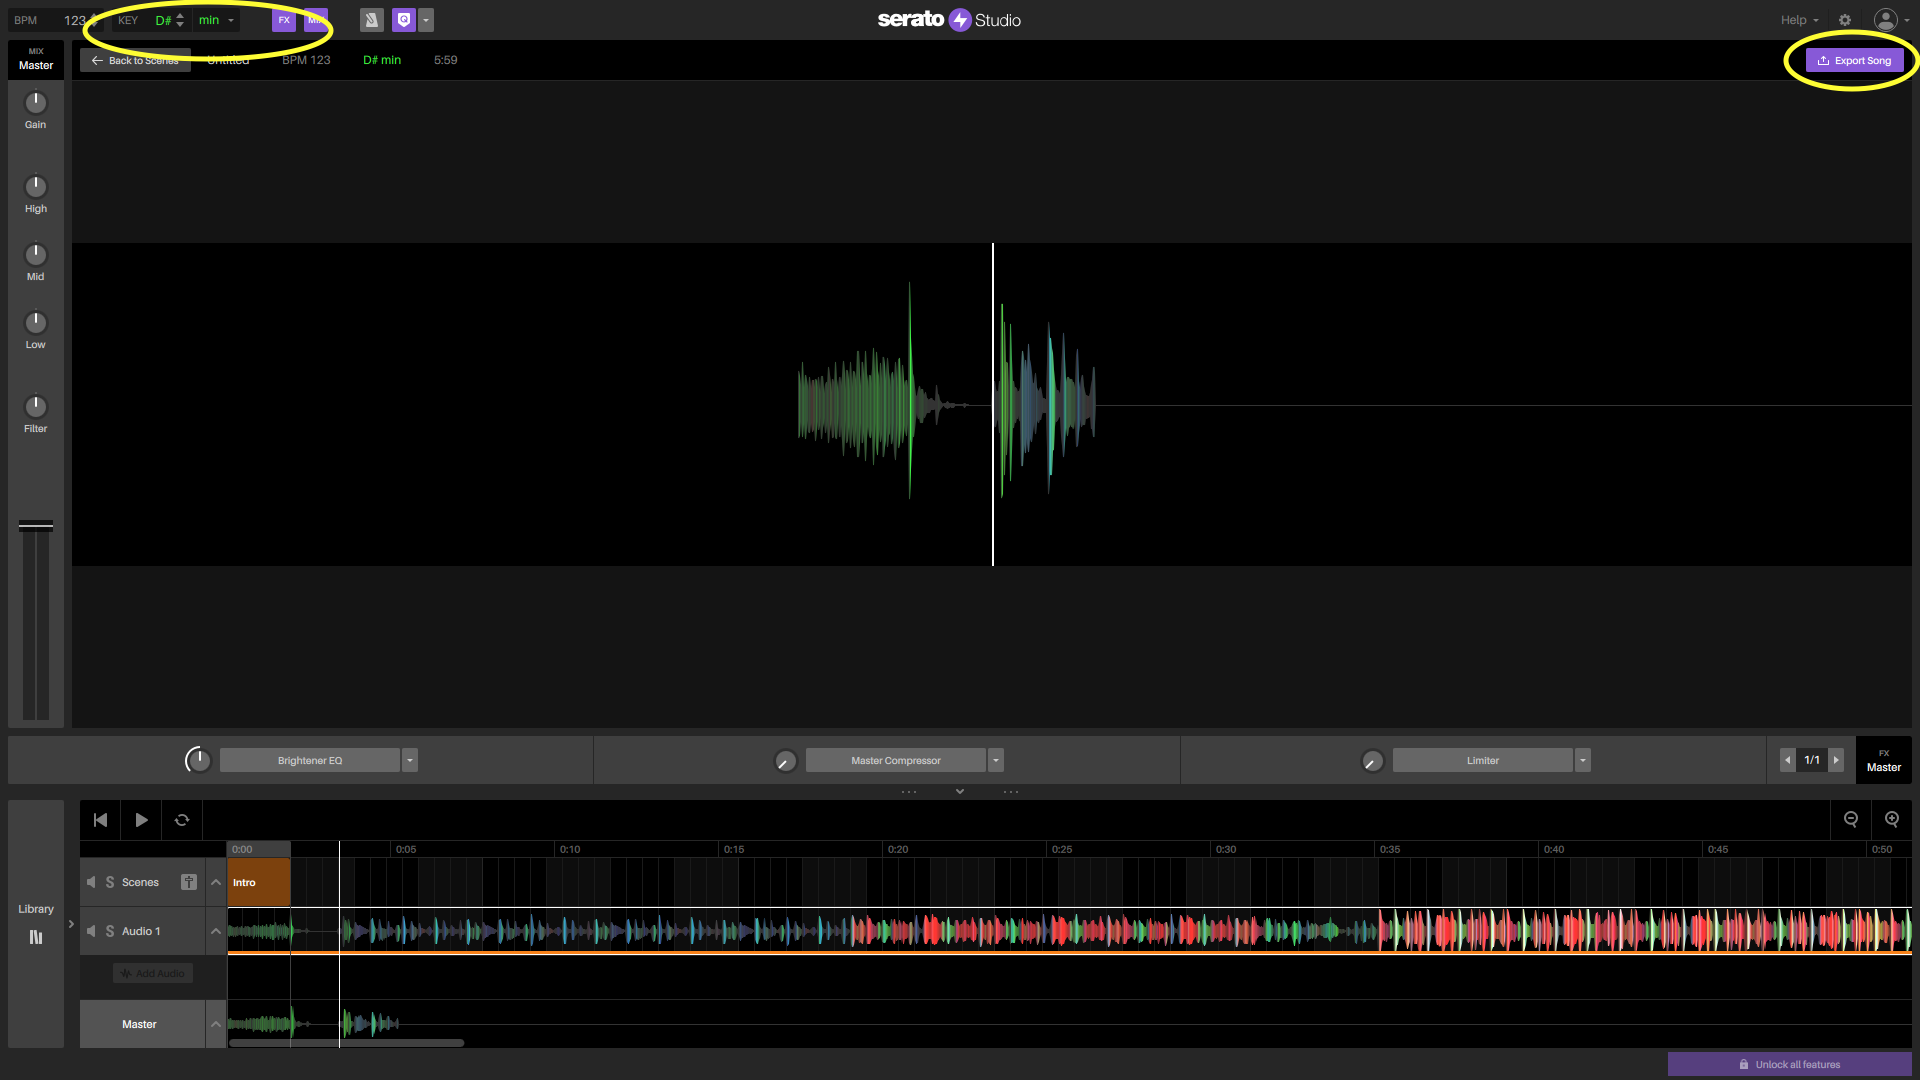
It is time to move to Ableton Live to take this mash up production to the next level, and we’ll be doing another ‘hack’ in the process. As we can’t export stems in the free version of Serato Studio we need to solo each track then export them both separately.

Now we have three files ready to import into Ableton Live. There is the ‘main’ track (“Seventies”) restructured, and the ‘secondary’ track (“Oh La La”) restructured. We also have “Oh La La” in full but with the key and tempo matched to “Seventies”.
We can drag and drop these into Ableton Live holding cmd (mac) or ctrl (windows) so they land at the same start point and on their own audio channels. At this point it’s a good idea to ensure the first beat is tight to the start of the session, and to set the session tempo to match the Serato Studio session tempo (in this case 123bpm).
Next we will turn the warp algorithm to ‘complex’ to avoid any warping artefacts. We will switch the Track Activator to off for the key and tempo synced version of “Oh La La’, and create a new audio channel (or two, or three) to incorporate some of this (probably with FX) when needed.

After diving in and doing some editing we can hear that “Oh La La” is slightly behind the beat, so we can fix this with Live’s powerful warping capabilities.


Now it is a matter of adding that final flourish and spice from the parts of the track we could not utilise in Serato Studio, namely, in this case, the main “Oh La La” Chorus and the main build up, plus a few other cuts with some delay and reverb to help the track move along seamlessly. We can also use automation on an Auto Filter and Delay to create our own breaks in the ‘main’ track.

How to Make a Mash Up Step 5
Add Some Fairy Dust
At this point of making a mashup, even if you are using Ableton Live Intro you will have a few audio channels that you can utilise to add in some uplifters, impacts or any other fairy dust that might help bring the track together. It’s also a good idea to have a few listen-throughs and check everything is in-time and gelling together nicely.
Now we are ready to add that bit of spit and polish that is the master chain before exporting and playing out in our sets. Even though we previously brought down the volume of the tracks in Studio we need to make sure that we aren’t clipping in Live so we will bring all the channel faders down by around -3db (probably a bit more for the key and tempo synced cuts that we added in Ableton Live) so we have some headroom for the master compressor and limiter to do their thing.
This is a basic master chain that will provide a bit of glue and loudness to our overall production. A Saturator with equal amounts of drive and output reduction on the output will stitch elements together, some EQ to tame any ultra lows and maybe brighten some highs, compression with equal Gain Reduction and Make Up, then a limiter with no more than 5db Gain Reduction should make the track pump nicely.
Feel free to copy the settings in this mashup example but remember passing your pre-master productionsto a mastering engineer will almost always yield better results, especially if you plan on playing your tracks on big systems.

Final Pointers on How to Make a Mash Up
In this easy to follow “how to make a mashup” example we have utilised the free version of Serato Studio in tandem with Ableton Live, the Lite version of which comes free with loads of products such as Focusrite Audio Interfaces (and is just £69 to buy outright). You don’t need both softwares to make a good mash-up, but the key and tempo syncing of Serato Studio make a task like this an absolute dream, but it is likely that you might get frustrated by the limitations of the free version at one point or another.
The paid version of Serato Studio will provide an awful lot more in terms of decks, scenes and audio tracks, along with the ability to export stems without any ‘hacks’. You don’t necessarily have to export stems then reach for a more comprehensive DAW like Ableton Live (or FL Studio, Logic etc.), but you might still run into difficulties during the final stages of the production using Serato Studio alone.
Likewise, producing a mash-up like this in a DAW like Ableton Live or Logic can be time consuming and awkward, as having too many options available at the inception stage can actually be really distracting from the initial vision (remember the original mash-ups came from two turntables, a two channel mixer and maybe some FX). Not to mention how simple it is to ‘sketch’ ideas out in Serato Studio after it automatically syncs the key and tempo of your chosen tracks.
Finally, a word on releasing your bootlegs. It is straight up illegal to profit from someone else’s copyrighted work. It could land you in trouble if you attempt to make money by reselling mash-ups of other artists’ music. That said, there is nothing to stop you giving away these productions as free downloads or using them in your own DJ sets, so get learning how to mashup songs for your own sake, and have some fun!
